A laptop camera that suddenly stops working can interrupt an important meeting, online class, interview, or video call. You may see a black screen, receive a “We can’t find your camera” message, or discover that the webcam works in one app but not another.
The good news is that most laptop camera problems are caused by a closed privacy shutter, disabled permission, app conflict, or damaged driver. You can often solve the problem without repairing or replacing the laptop.
This guide explains how to fix camera not working on laptop devices running Windows 11, Windows 10, macOS, or ChromeOS. Start with the quick checks and continue in order until the camera works again.
Microsoft identifies privacy restrictions, driver problems, antivirus blocking, and app-related issues as common causes of camera failure in Windows.
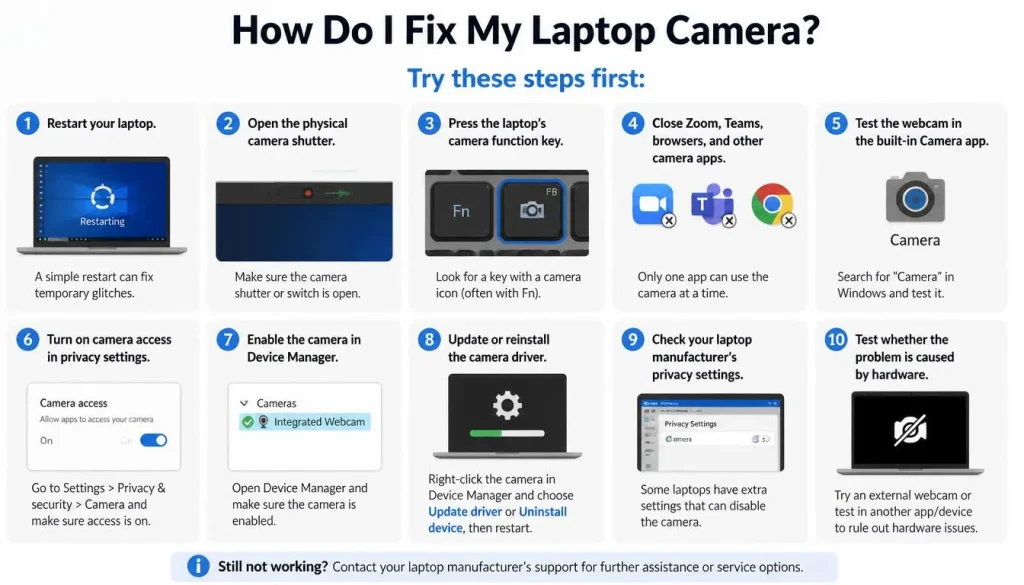
Quick Answer: How Do I Fix My Laptop Camera?
Try these steps first:
- Restart your laptop.
- Open the physical camera shutter.
- Press the laptop’s camera function key.
- Close Zoom, Teams, browsers, and other camera apps.
- Test the webcam in the built-in Camera app.
- Turn on camera access in privacy settings.
- Enable the camera in Device Manager.
- Update or reinstall the camera driver.
- Check your laptop manufacturer’s privacy settings.
- Test whether the problem is caused by hardware.
If the camera works in the Windows Camera app but not in Zoom, Teams, or Google Meet, the laptop camera itself is probably working. Focus on the affected app’s camera selection and permission settings.
Why Is My Laptop Camera Not Working?
Your laptop camera may stop working for several reasons.
The most common causes include:
- The physical privacy shutter is closed.
- A camera privacy key has disabled the webcam.
- Windows or macOS camera access is turned off.
- The app does not have permission to use the camera.
- Another app is already using the webcam.
- The wrong camera is selected.
- The camera driver is missing, outdated, or corrupted.
- A recent operating system update caused a driver conflict.
- Antivirus or privacy software is blocking camera access.
- The camera is disabled in BIOS or a manufacturer utility.
- A work or school administrator has restricted camera access.
- The internal camera cable or camera module has failed.
Do not assume the webcam is physically broken until you have tested permissions, apps, drivers, and hardware detection.
Match Your Camera Problem to the Right Fix
Use this table to find the best starting point.
| Camera problem | Best place to start |
|---|---|
| Camera shows a black screen | Check the shutter, permissions, and app conflicts |
| Camera is missing completely | Check Device Manager, BIOS, and drivers |
| Camera works in one app only | Check the affected app’s settings |
| Camera stopped after an update | Roll back or reinstall the driver |
| Camera light is on but no image appears | Close other camera apps |
| Camera access is greyed out | Use an administrator account or contact IT |
| Windows Hello does not work | Check the IR camera and face sign-in settings |
| External webcam is not detected | Change the USB port and test the cable |
| Camera image is blurry | Clean the lens and improve lighting |
| Camera stops after sleep mode | Restart the app and update camera or chipset drivers |
Quick Checks Before Advanced Troubleshooting
Complete these simple checks before changing drivers or BIOS settings.
Restart Your Laptop
A restart closes background apps and reloads the camera driver.
Do not only close and reopen the laptop lid. Select Restart from the power menu. A full restart is more useful when the webcam stopped working after sleep or hibernation.
After restarting, open the built-in Camera app and test the webcam again.
Open the Physical Camera Shutter
Many modern laptops include a privacy shutter above the screen. When it is closed, the camera may show a black screen even though the camera light turns on.
Look for:
- A small slider beside the webcam
- A red dot over the camera lens
- A sliding cover at the top of the display
- A privacy switch on the side of the laptop
Move the shutter until the lens is fully visible.
Press the Camera Function Key
Some Dell, HP, Lenovo, ASUS, Acer, and Microsoft laptops include a keyboard key that disables the camera.
Look for a key with:
- A camera icon
- A crossed-out camera
- A privacy symbol
Press the key once. On some laptops, you must press Fn and the camera key together.
Wait a few seconds, then reopen the Camera app.
Clean the Camera Lens
Fingerprints, dust, protective film, and adhesive residue can make the image look black, cloudy, or blurry.
Use a clean, dry microfiber cloth. Do not apply cleaning liquid directly to the camera.
Also check whether a screen protector or thick webcam cover blocks part of the lens.
Disconnect Unnecessary USB Devices
USB hubs, capture cards, external webcams, docks, and other video devices can create conflicts.
Disconnect all unnecessary USB devices. If you use an external webcam, connect it directly to the laptop instead of using a hub.
Test the Camera in Another App
On Windows, open the Camera app from the Start menu.
On a MacBook, test the camera in Photo Booth or FaceTime.
On a Chromebook, test it in the Camera app or Google Meet.
If the camera works in one app, the problem is likely related to the original app’s permission or video settings rather than the camera hardware.
How to Fix Camera Not Working on a Windows Laptop
The following solutions apply mainly to Windows 11. Most also work on Windows 10, although some menu names may look different.
Windows 10 note: Microsoft ended standard Windows 10 support on October 14, 2025. Windows 10 computers still function, but systems outside an Extended Security Updates program no longer receive normal free security updates or technical support. Consider upgrading to Windows 11 if your laptop supports it.
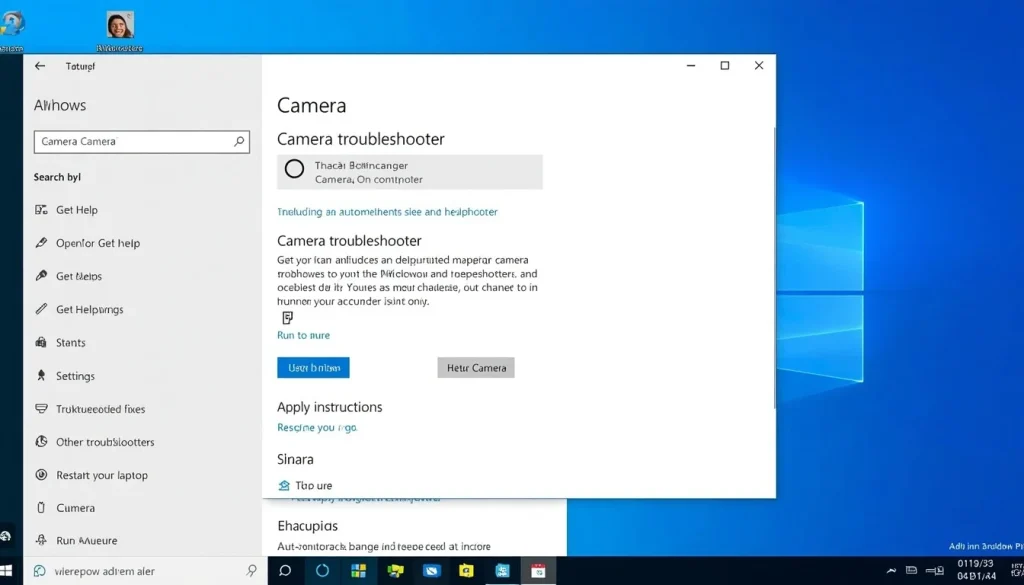
1. Run the Windows Camera Troubleshooter
Windows includes an automated troubleshooter that can detect common camera problems.
To run it:
- Open Start.
- Search for Get Help.
- Open the Get Help app.
- Search for camera troubleshooter.
- Follow the instructions.
- Apply any recommended fixes.
- Restart your laptop.
You can also go to:
Settings > System > Troubleshoot > Other troubleshooters
Find Camera and select Run if that option is available.
Microsoft recommends the automated Camera troubleshooter as an early step because it can diagnose and attempt to repair common webcam issues.
2. Turn On Camera Access in Windows Settings
The webcam cannot work in apps when camera access is disabled.
On Windows 11:
- Open Settings.
- Select Privacy & security.
- Select Camera.
- Turn on Camera access.
- Turn on Let apps access your camera.
- Enable access for the app you want to use.
- Turn on Let desktop apps access your camera.
The last option is important for browsers, Zoom, Microsoft Teams, Discord, Skype, and many programs downloaded outside the Microsoft Store.
Windows controls camera access at the device, app, and desktop-app levels. A browser or desktop meeting app may need the desktop-app permission even when general camera access is already enabled.
3. Enable the Camera in Windows 11 Camera Settings
Windows 11 can disable a connected camera through the Cameras settings page.
To check:
- Open Settings.
- Select Bluetooth & devices.
- Select Cameras.
- Look under Disabled cameras.
- Select your webcam.
- Select Enable.
If the webcam does not appear on this page, continue to Device Manager.
Microsoft confirms that cameras listed under Disabled cameras can be enabled from Settings > Bluetooth & devices > Cameras.
4. Close Other Apps Using the Camera
Most webcams cannot provide full access to several apps at the same time. Zoom may fail if Teams, OBS Studio, Discord, Skype, or a browser tab is already using the camera.
Close all camera-related apps.
To force an app to close:
- Press Ctrl + Shift + Esc.
- Open Task Manager.
- Select the app that may be using the camera.
- Select End task.
- Reopen only the app you need.
Also close browser tabs containing Google Meet, Facebook video, online camera tests, or other video services.
5. Select the Correct Camera
Laptops may have more than one video source, such as:
- A built-in webcam
- An infrared camera
- An external USB webcam
- A virtual camera
- A capture card
- Smartphone camera software
Open the video settings in your meeting app and choose the correct camera.
In Zoom
- Open Zoom.
- Open Settings.
- Select Video.
- Choose your built-in or external webcam from the Camera menu.
In Microsoft Teams
- Open Teams settings.
- Select Devices.
- Find the Camera section.
- Choose the correct webcam.
- Check the video preview.
In Google Meet
- Open Google Meet.
- Select Settings.
- Select Video.
- Choose the correct camera.
- Reload or rejoin the meeting if needed.
Do not select an IR camera for normal video calls. An IR camera is mainly used for features such as Windows Hello facial recognition.
6. Check Browser Camera Permissions
A website can be blocked even when Windows camera access is enabled.
In Chrome or Edge:
- Open the website that needs the camera.
- Select the lock or site-controls icon beside the address.
- Find Camera.
- Change the setting to Allow.
- Reload the page.
You can also open the browser’s privacy and site settings, then review the Camera permission list.
If it still does not work:
- Open the site in a private or incognito window.
- Disable privacy or camera-related extensions.
- Clear the site’s saved permission.
- Update the browser.
- Test a different browser profile.
- Try another supported browser.
If the camera works in the Camera app but not in a browser, the issue is usually related to browser permission, site permission, extension interference, or the selected video source.
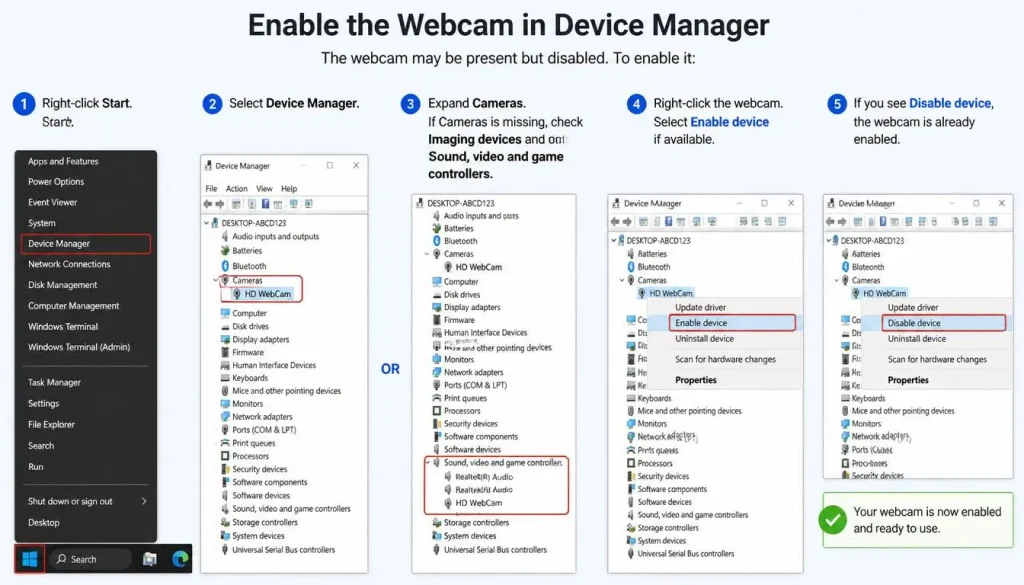
7. Enable the Webcam in Device Manager
The webcam may be present but disabled.
To enable it:
- Right-click Start.
- Select Device Manager.
- Expand Cameras.
- If Cameras is missing, check Imaging devices and Sound, video and game controllers.
- Right-click the webcam.
- Select Enable device if available.
If you see Disable device, the webcam is already enabled.
8. Scan for Hardware Changes
If the camera is missing from Device Manager:
- Open Device Manager.
- Select View.
- Select Show hidden devices.
- Select Action.
- Select Scan for hardware changes.
- Wait for Windows to search for the camera.
- Restart the laptop.
Microsoft recommends scanning for hardware changes when the camera is not listed under Cameras, Imaging devices, or Sound, video and game controllers.
9. Update the Camera Driver
An outdated or damaged driver can prevent Windows from detecting the camera.
To update it:
- Open Device Manager.
- Expand Cameras.
- Right-click the webcam.
- Select Update driver.
- Select Search automatically for drivers.
- Install any available update.
- Restart the laptop.
You should also check:
Settings > Windows Update > Advanced options > Optional updates
Install relevant camera, imaging, chipset, or system driver updates.
If Windows cannot find a driver, visit your laptop manufacturer’s official support page. Search using the exact laptop model or serial number.
Avoid random driver-download websites and unknown driver updater tools.
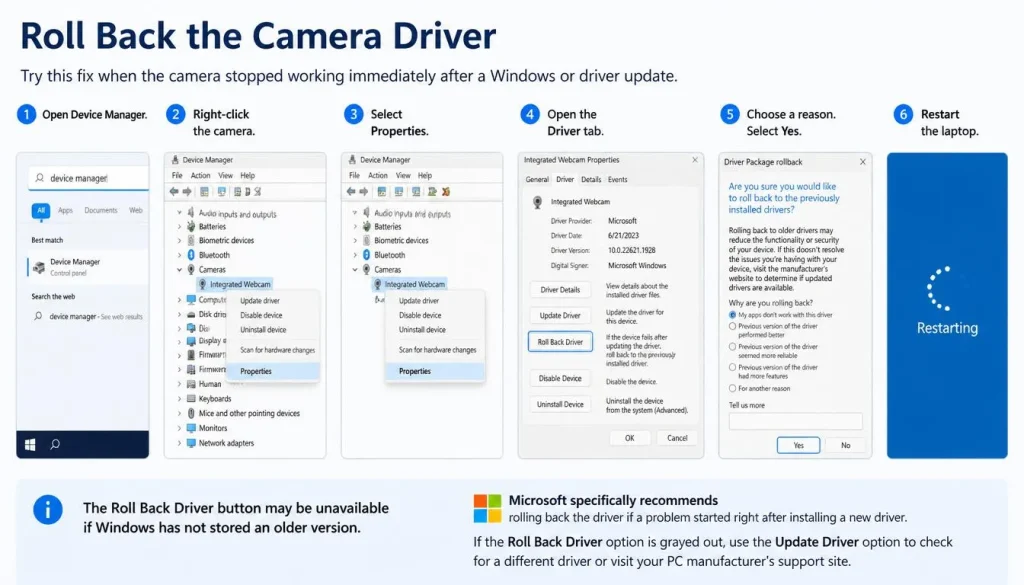
10. Roll Back the Camera Driver
Try this fix when the camera stopped working immediately after a Windows or driver update.
- Open Device Manager.
- Right-click the camera.
- Select Properties.
- Open the Driver tab.
- Select Roll Back Driver.
- Choose a reason.
- Select Yes.
- Restart the laptop.
The Roll Back Driver button may be unavailable if Windows has not stored an older version.
Microsoft specifically recommends rolling back the camera driver when webcam problems begin after an update.
11. Uninstall and Reinstall the Camera Driver
A clean driver reinstall can fix corrupted driver files.
- Open Device Manager.
- Right-click the webcam.
- Select Properties.
- Open the Driver tab.
- Select Uninstall Device.
- If offered, select the option to attempt to remove the driver.
- Confirm the uninstall.
- Select Action > Scan for hardware changes.
- Restart your laptop.
Windows may reinstall a basic driver automatically. If it does not, download the correct camera package from the laptop manufacturer.
12. Switch an External Webcam to the UVC Driver
This fix is mainly for external USB webcams. Do not use it as the first choice for a built-in MIPI camera.
To switch drivers:
- Open Device Manager.
- Right-click the external webcam.
- Select Update driver.
- Select Browse my computer for drivers.
- Select Let me pick from a list of available drivers on my computer.
- Choose USB Video Device.
- Select Next.
- Restart the computer.
Most USB webcams support the standard Windows UVC driver. However, changing to the generic driver may remove manufacturer features, and Windows Hello may stop working on cameras that depend on custom extensions.
13. Repair or Reset the Windows Camera App
If the Camera app freezes, crashes, or will not open:
- Open Settings.
- Select Apps.
- Select Installed apps.
- Find Camera.
- Select the three-dot menu.
- Select Advanced options.
- Select Repair.
- Test the app.
If Repair does not work, return to the same page and select Reset.
Resetting deletes the app’s saved settings but does not normally delete photos already stored in your Pictures folder.
Also open Microsoft Store and check for an update to the Camera app.
14. Check Antivirus and Privacy Software
Some security programs include features named:
- Webcam Protection
- Camera Protection
- SafeCam
- Privacy Shield
- Application Control
Open your antivirus or privacy software and check whether the meeting app or browser has been blocked.
You can temporarily pause only the webcam-protection feature to test the camera. Turn protection back on after testing.
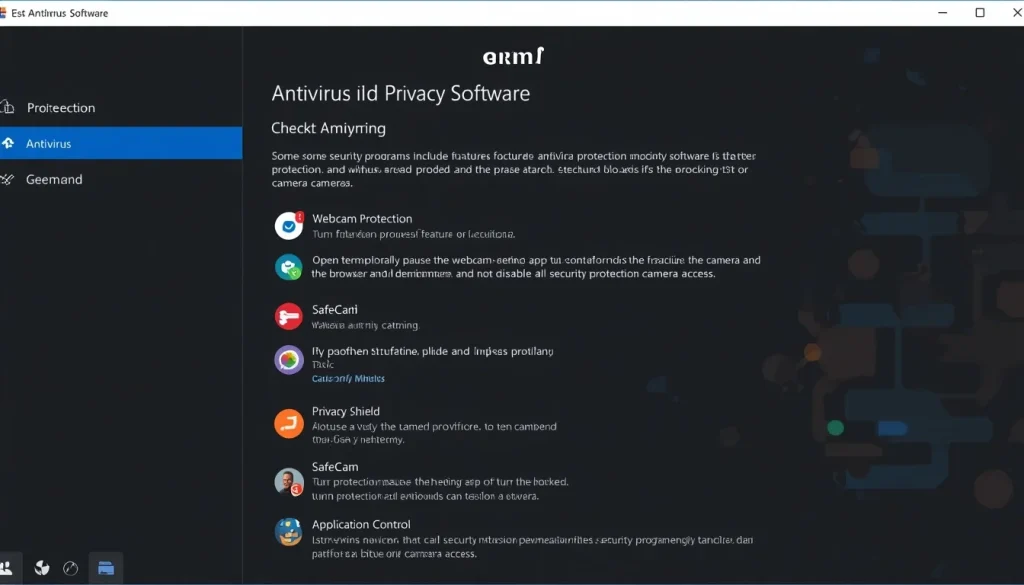
Do not disable all security protection permanently. Microsoft notes that antivirus programs and firewalls can block camera access.
15. Check Your Laptop Manufacturer’s Camera Settings
Laptop utilities can disable the built-in webcam separately from Windows settings.
Check any manufacturer app installed on your laptop, such as:
- Lenovo Vantage
- MyASUS
- Dell Optimizer or SupportAssist
- HP Support Assistant
- AcerSense
- Microsoft Surface app
Look for settings named Camera Privacy Mode, Webcam Privacy, Intelligent Privacy, SafeShutter, or Device Settings.
Also inspect the laptop for a side switch or electronic privacy shutter.
16. Check the Camera in BIOS or UEFI
Some business and professional laptops allow the integrated camera to be disabled in BIOS.
Use this step only if the webcam is missing from both Windows settings and Device Manager.
- Restart the laptop.
- Press the manufacturer’s BIOS key during startup.
- Look under Security, Integrated Devices, I/O Port Access, or a similar menu.
- Find Integrated Camera or Webcam.
- Make sure it is enabled.
- Save changes and exit.
Common BIOS keys include F2, F10, Delete, or Esc, but the correct key depends on the laptop model.
Do not change unrelated BIOS settings.
17. Perform a Full Power Reset
A full power reset can help when the camera stops being detected after sleep, a crash, or a failed update.
- Shut down the laptop.
- Disconnect the charger.
- Disconnect all USB devices.
- Hold the power button for 15 to 20 seconds.
- Reconnect the charger.
- Start the laptop.
- Test the camera.
Do not remove an internal battery or open the laptop unless the manufacturer’s instructions specifically tell you to do so.
18. Fix Camera Access That Is Greyed Out
If the Camera access switch cannot be changed, an administrator may control it.
Try these steps:
- Sign in with an administrator account.
- Check whether the laptop belongs to a company or school.
- Open Settings > Accounts > Access work or school.
- Review connected work or school accounts.
- Contact the organization’s IT department if the device is managed.
Do not edit Group Policy or the Windows registry on a managed computer without permission.
Microsoft states that an administrator must change camera access when the user cannot modify the setting.
19. Fix Windows Hello Face Recognition
Your normal webcam may work even when Windows Hello does not. Windows Hello Face usually depends on a compatible infrared camera, not only the standard camera used for video calls.
Start with these checks:
- Clean the camera area.
- Open the physical camera shutter.
- Improve the lighting.
- Remove anything blocking your face.
- Install Windows and manufacturer driver updates.
You can also improve or reset facial recognition:
- Open Settings.
- Select Accounts.
- Select Sign-in options.
- Open Facial recognition (Windows Hello).
- Select Improve recognition.
If that fails:
- Return to Facial recognition settings.
- Select Remove.
- Restart the laptop.
- Select Set up.
- Scan your face again.
Microsoft recommends cleaning the camera, checking lighting, improving recognition, or removing and rescanning facial data when Windows Hello does not recognize the user.
20. Fix Intel AVStream or MIPI Camera Problems
Some newer laptops use MIPI cameras instead of standard USB webcams. These cameras may need several model-specific drivers.
Possible signs include:
- Intel AVStream Camera has a yellow warning icon.
- A camera sensor has a warning in Device Manager.
- The Camera app says it cannot find the camera.
- The webcam fails in Zoom, Teams, or Discord.
- The problem began after reinstalling Windows.
- The camera is missing even though no obvious error appears.
To fix it:
- Visit the laptop manufacturer’s official support page.
- Enter the exact model or service tag.
- Install the latest BIOS update if recommended.
- Install chipset and system drivers.
- Install the manufacturer’s complete camera or imaging package.
- Restart the laptop after installation.
Do not force a generic USB Video Device driver onto a MIPI camera unless the manufacturer specifically recommends it.
Dell explains that MIPI cameras require different drivers from conventional webcams. Missing or incorrect components can cause errors in the Windows Camera app, yellow warnings in Device Manager, or camera failures in meeting apps.
How to Fix Specific Laptop Camera Problems
Laptop Camera Shows a Black Screen
Try the following:
- Open the physical shutter.
- Remove any camera cover or protective film.
- Increase the room lighting.
- Close all other camera apps.
- Restart the Camera app.
- Select the correct webcam.
- Turn on Windows camera permissions.
- Disable virtual camera software temporarily.
- Update or reinstall the camera driver.
If the camera light turns on but the screen stays black, another app may control the webcam, or the shutter may still be closed.
Windows Says “We Can’t Find Your Camera”
This message often appears with:
0xA00F4244 NoCamerasAreAttached
The error means Windows cannot recognize a built-in or external camera. Microsoft reports that it is commonly associated with missing, outdated, or corrupted camera drivers.
Try these fixes:
- Check the camera shutter and function key.
- Turn on camera privacy permissions.
- Enable the webcam in Device Manager.
- Scan for hardware changes.
- Update or reinstall the driver.
- Check BIOS camera settings.
- Install the manufacturer’s complete camera package.
- Test for a MIPI driver problem.
Camera Is Missing From Device Manager
If no camera appears:
- Select View > Show hidden devices.
- Check Cameras, Imaging devices, and Sound, video and game controllers.
- Select Action > Scan for hardware changes.
- Check the BIOS or manufacturer privacy utility.
- Install chipset and camera drivers.
- Test an external webcam.
- Contact the manufacturer if the internal camera remains missing.
A camera missing from Device Manager does not always prove hardware failure. The correct MIPI or sensor driver may be absent.
Camera Light Is On but No Picture Appears
Close every program that could use the camera, including background meeting apps and browser tabs.
Then:
- Open Task Manager.
- End Zoom, Teams, Discord, Skype, OBS, and browser processes.
- Restart the Camera app.
- Check the physical shutter.
- Restart the laptop.
If the light remains on when no camera app is open, run a scan with Windows Security or another trusted security program.
Do not immediately assume that the webcam has been hacked. A background app, browser tab, biometric feature, or privacy utility is a more common explanation.
Camera Is Blurry or Poor Quality
Improve the image with these steps:
- Clean the lens with a microfiber cloth.
- Remove protective film.
- Face a soft light source.
- Avoid sitting with a bright window behind you.
- Select a higher video resolution.
- Disable excessive digital zoom.
- Check the app’s video filters.
- Improve the internet connection during calls.
- Update the webcam driver.
A slow connection can make video appear soft, frozen, or pixelated even when the camera hardware is working.
Camera Keeps Freezing or Turning Off
Try these fixes:
- Restart the meeting app.
- Close unnecessary programs.
- Update camera and graphics drivers.
- Install Windows updates.
- Disconnect USB hubs.
- Connect an external webcam directly.
- Check the webcam cable.
- Update the laptop’s BIOS and chipset drivers.
- Test whether the problem occurs after sleep mode.
If the camera works after every restart but fails after the laptop wakes, focus on driver, firmware, and power-management updates.
Camera Image Is Upside Down or Mirrored
A mirrored self-preview is normal in many meeting apps. Other participants may still see the image correctly.
If the image is truly upside down:
- Check the app’s rotate or mirror setting.
- Disable virtual camera software.
- Update the webcam driver.
- Remove an incorrect generic driver.
- Install the official manufacturer driver.
Fix Camera Error Codes in Device Manager
Open Device Manager, right-click the camera, select Properties, and read the message under Device status.
| Error code | What it usually means | Recommended action |
|---|---|---|
| Code 22 | The device is disabled | Select Enable device |
| Code 28 | The driver is not installed | Install or reinstall the driver |
| Code 31 | Windows cannot load the required driver | Update or reinstall the driver |
| Code 43 | The device reported a problem | Restart, reinstall the driver, and test hardware |
| Code 45 | The device is not connected | Reconnect the external webcam or cable |
Microsoft provides error-specific resolutions through Device Manager and recommends updating or reinstalling drivers for several common codes.
Laptop Camera Works in One App but Not Another
When the camera works in the built-in Camera app, avoid reinstalling the driver immediately. The problem is more likely inside the affected app.
Check these items:
- Confirm the app has camera permission.
- Select the correct webcam.
- Close other camera apps.
- Update the affected app.
- Sign out and sign back in.
- Clear the app’s cache if supported.
- Reinstall the app if necessary.
Fix Camera Not Working in Zoom
- Open Zoom Video settings.
- Select the correct camera.
- Close Teams and browser meeting tabs.
- Check Windows privacy permissions.
- Disable virtual backgrounds temporarily.
- Update Zoom.
- Restart the laptop.
Fix Camera Not Working in Microsoft Teams
- Open Teams Device settings.
- Select the correct camera.
- Check the video preview.
- Turn on desktop-app camera permission in Windows.
- Close other apps using the camera.
- Update or reinstall Teams.
Fix Camera Not Working in Google Meet
- Allow camera access for the Meet website.
- Select the correct camera in Meet settings.
- Reload the browser tab.
- Close other video-call tabs.
- Test an incognito or private window.
- Disable privacy extensions.
- Update the browser.
Fix Camera Not Working in Discord or Skype
- Open the app’s Voice and Video settings.
- Select the built-in or external webcam.
- Close other camera apps.
- Turn off virtual camera software.
- Update the app.
- Reinstall it if the problem continues.
How to Fix Camera Not Working on a MacBook
MacBook camera problems are usually related to app permission, Screen Time restrictions, outdated software, or a temporary system issue.
Test the Camera in Another Mac App
Open Photo Booth or FaceTime.
If the camera works there, review the settings and permissions of the original app.
If it fails in every app, continue with the following steps.
Allow Camera Access in macOS
- Open the Apple menu.
- Select System Settings.
- Select Privacy & Security.
- Select Camera.
- Turn on access for the affected app.
- Quit and reopen the app.
Installed third-party apps must be given permission before they can use the Mac camera.
Check Screen Time Restrictions
- Open System Settings.
- Select Screen Time.
- Select Content & Privacy.
- Open App Restrictions or Apps.
- Make sure Camera is allowed.
- Check whether an app limit blocks the affected app.
Close Other Camera Apps
Quit FaceTime, Photo Booth, Zoom, Teams, browsers, and other video apps.
You can also open Activity Monitor and close a frozen camera app.
Update macOS and the App
Install the latest macOS update available for your Mac. Then update Zoom, Teams, Chrome, or the app that cannot access the camera.
Restart the Mac after updating.
Restart the Mac or Reset the SMC
For a Mac with Apple silicon, restart the computer.
For an Intel-based Mac, an SMC reset may help when a hardware-related function does not respond. Use Apple’s instructions for your exact model.
Apple currently recommends updating software, checking Screen Time, granting permission, restarting an Apple silicon Mac, or resetting the SMC on an Intel Mac.
Contact Apple for Service
The MacBook may need service when:
- The camera fails in every app.
- The indicator light flashes green.
- Permissions and Screen Time settings are correct.
- Restarting and updating do not help.
- The Mac has display, hinge, or liquid damage.
How to Fix Camera Not Working on a Chromebook
Try these solutions in order.
Restart the Chromebook
Turn the Chromebook completely off, wait a few seconds, and turn it back on.
Test the Camera in Another App
Try the Chromebook Camera app and Google Meet.
If the camera works in one app, update or reinstall the app that fails.
Google recommends restarting the Chromebook, testing the camera in another app, and reinstalling the affected app when necessary.
Check Camera Privacy Controls
- Open Settings.
- Select Privacy and security.
- Open Privacy controls.
- Make sure camera access is enabled.
Also check the website’s camera permission in Chrome.
Update ChromeOS
- Open Settings.
- Select About ChromeOS.
- Select Check for updates.
- Install the update.
- Restart the Chromebook.
Reset Chromebook Hardware
A hardware reset can refresh the connection between ChromeOS and internal hardware.
The reset method varies by device. On many Chromebooks, you shut down the device, hold Refresh, and tap Power. Check the manufacturer’s instructions before performing the reset.
Consider a Chromebook Reset or Recovery
Use a Powerwash or system recovery only after backing up important local files.
If the Chromebook belongs to a school or company, contact the administrator instead of resetting it yourself.
What to Do if an External Webcam Is Not Working
External webcam problems are often caused by a USB port, cable, hub, driver, or camera-selection issue.
Try these steps:
- Disconnect and reconnect the webcam.
- Try another USB port.
- Avoid unpowered USB hubs.
- Test another cable if the webcam uses a removable cable.
- Restart the laptop.
- Select the external webcam in the meeting app.
- Install the manufacturer’s app or driver.
- Test the webcam on another computer.
If the webcam works on another computer, focus on your laptop’s USB ports, permissions, and drivers.
If it fails on every computer, the webcam or cable may be damaged.
How to Tell if the Laptop Camera Has a Hardware Problem
A hardware problem becomes more likely when:
- The webcam is missing from both BIOS and Device Manager.
- It fails in every app and operating system test.
- Correct drivers do not detect it.
- The camera works only when the laptop screen is moved.
- The laptop has hinge or display damage.
- Liquid entered the display area.
- The camera image flickers when the lid moves.
- An external webcam works normally, but the built-in camera never appears.
A webcam that works only at certain screen angles may have a damaged display cable or loose internal connection.
Do not open a laptop that is under warranty. Contact the manufacturer or an authorized repair provider.
When Should You Contact the Laptop Manufacturer?
Contact Dell, HP, Lenovo, ASUS, Acer, Microsoft, Apple, or another manufacturer when:
- The laptop is still under warranty.
- The camera is missing after driver and BIOS checks.
- The device has physical or liquid damage.
- Manufacturer diagnostics report a failure.
- The correct MIPI driver package does not restore the camera.
- The camera cable may be damaged.
- You are uncomfortable changing BIOS settings.
Provide the support agent with:
- The laptop model
- Serial number or service tag
- Operating system version
- Camera error message
- Device Manager error code
- Troubleshooting steps already completed
Should You Repair the Camera or Buy an External Webcam?
| Situation | Best option |
|---|---|
| Temporary software problem | Continue troubleshooting the built-in camera |
| You need a camera immediately | Use an external USB webcam |
| Laptop is under warranty | Request manufacturer service |
| Display cable or hinge is damaged | Arrange professional repair |
| Built-in camera quality is poor | Buy a better external webcam |
| Repair costs are high on an old laptop | Use an external webcam |
| Camera is needed for Windows Hello | Repair the compatible internal or IR camera |
An external webcam is often the fastest solution, but it may not replace an internal IR camera used for Windows Hello.
How to Prevent Laptop Camera Problems
Use these practices to reduce future webcam issues:
- Keep the operating system updated.
- Install drivers from official manufacturer websites.
- Avoid unknown driver update tools.
- Review camera permissions after major updates.
- Keep the lens clean.
- Close video apps when they are not in use.
- Avoid forcing thick camera covers against the display.
- Protect the laptop from drops and liquid.
- Do not pull or twist the screen roughly.
- Keep manufacturer utilities updated.
Apple warns that a thick camera cover can damage a Mac laptop’s display because the clearance between the screen and keyboard is very small. Apple recommends a cover no thicker than approximately 0.1 mm when one is required.
Frequently Asked Questions
Why is my laptop camera not working?
The camera may be disabled by a privacy shutter, keyboard key, operating system permission, app setting, antivirus program, damaged driver, BIOS setting, or hardware fault. Start by restarting the laptop, opening the shutter, checking permissions, and testing the camera in another app.
How do I turn my camera back on my laptop?
Open the physical camera shutter and press the camera privacy key. On Windows 11, go to Settings > Privacy & security > Camera and turn on Camera access. Then open Device Manager and make sure the webcam is enabled.
Why is my laptop camera showing a black screen?
A closed shutter is one of the most common reasons. The camera may also be used by another app, blocked by privacy settings, or affected by a driver problem. Close other camera apps, select the correct webcam, and restart the laptop.
How do I reset my laptop camera?
Restart the laptop first. On Windows, you can repair or reset the Camera app through Settings > Apps > Installed apps > Camera > Advanced options. You can also uninstall the camera driver in Device Manager and restart Windows.
Why is my camera missing from Device Manager?
The camera may be disabled in BIOS, hidden in Device Manager, missing a driver, blocked by a manufacturer privacy setting, or physically disconnected. Select View > Show hidden devices, scan for hardware changes, and install the official camera package.
Why is my camera not working after a Windows update?
The update may have installed an incompatible driver or changed camera permissions. Check privacy settings, install optional driver updates, roll back the camera driver, or uninstall and reinstall it.
Why does my camera work in the Camera app but not in Zoom?
The webcam hardware and basic driver are probably working. Check Zoom’s camera selection, Windows desktop-app permission, and whether another meeting app is using the camera.
Why is camera access greyed out?
An administrator, employer, school, or device-management policy may control the setting. Sign in with an administrator account or contact the organization’s IT department.
Why does my webcam work but Windows Hello does not?
Windows Hello Face usually needs a compatible IR camera. A standard webcam may work for video calls without supporting facial sign-in. Update the IR camera driver and use Improve Recognition or set up Windows Hello Face again.
What does a yellow warning icon on my camera mean?
The icon usually indicates a driver, configuration, or hardware problem. Open the camera’s Properties page in Device Manager and read the Device status error code. Then update or reinstall the correct driver.
Can antivirus software block my laptop camera?
Yes. Some antivirus and privacy tools include webcam protection that can block apps. Review the program’s camera or privacy settings and allow your trusted meeting app or browser.
How do I know if my laptop camera is broken?
Hardware failure is more likely when the camera is missing from BIOS and Device Manager, fails in every app, remains undetected after installing the correct drivers, or works only when the screen is moved.
Can I use an external webcam if the built-in camera is damaged?
Yes. A USB webcam can replace the built-in camera for meetings, classes, recording, and streaming. However, a normal external webcam may not support Windows Hello facial recognition.
Final Thoughts
When a laptop webcam stops working, begin with the simplest fixes. Restart the laptop, open the privacy shutter, press the camera key, and close other video apps.
Next, check operating system permissions and confirm that the correct camera is selected. If Windows still cannot detect it, update, roll back, or reinstall the camera driver.
A camera that works in one app but not another usually has an app or permission problem. A camera missing from every app and Device Manager may need manufacturer drivers, a BIOS change, or professional repair.
Following the fixes in order will help you find the cause without making unnecessary or risky system changes.

“Electronics aren’t just gadgets. They’re the invisible threads that connect our work, our play, and our world.”
I’m Julian Reed, and my obsession with tech started at age twelve, when I soldered a defunct gaming console back to life in my bedroom. That tiny green screen taught me that technology isn’t just a black box, it’s a tool you can master.
After fifteen years as a hardware engineer and a decade reviewing consumer tech, I’ve joined this team to cut through the jargon. Whether you’re building a high-end home theater or just need a laptop that won’t lag, I’m here to help you choose the gear that truly powers your life.