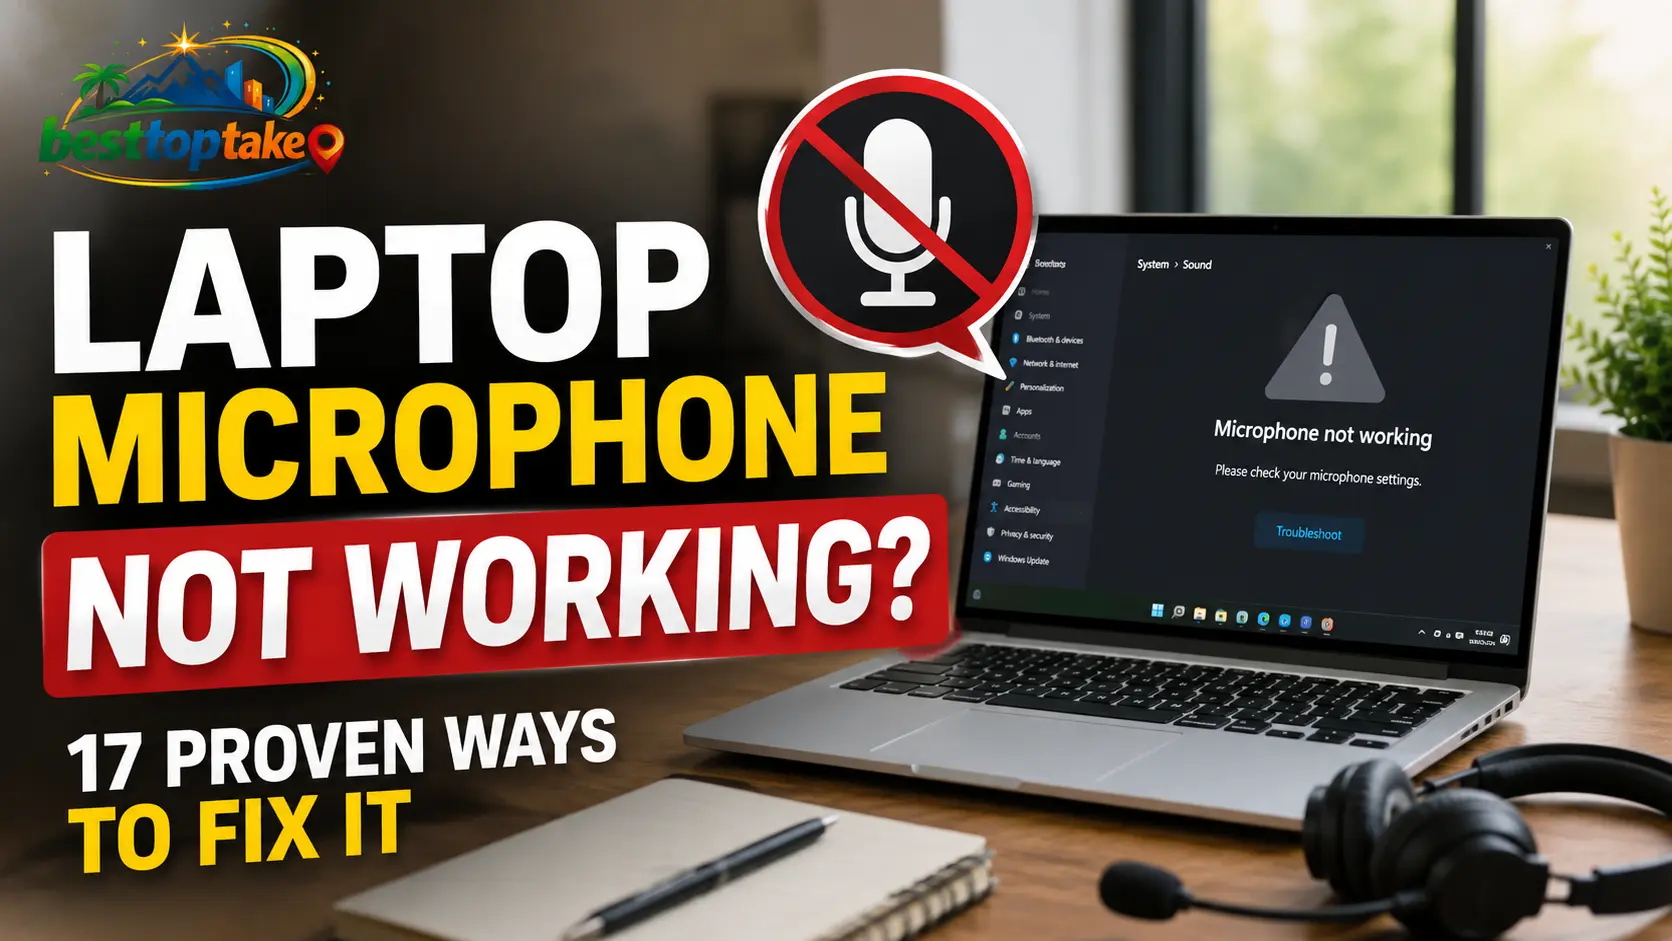
A laptop microphone can stop working for many reasons. The microphone may be muted, the wrong input device may be selected, or an app may not have permission to use it. Audio driver errors, browser settings, Bluetooth devices, and hardware damage can also cause the problem.
The good news is that most laptop microphone problems can be fixed without replacing the microphone.
This guide explains how to fix a laptop microphone that is not working on Windows 11, Windows 10, macOS, and ChromeOS. It also covers microphone problems in Zoom, Microsoft Teams, Google Meet, Discord, and web browsers.
Quick Fixes for a Laptop Microphone That Is Not Working
Try these quick checks before changing advanced settings:
- Make sure your microphone is not muted.
- Restart your laptop.
- Disconnect headphones, USB microphones, webcams, and Bluetooth audio devices.
- Select the correct microphone in your laptop’s sound settings.
- Increase the microphone input volume.
- Allow microphone access for the app you are using.
- Test the microphone in a different app.
On Windows, connected microphones appear under Settings > System > Sound > Input. Microsoft also recommends checking microphone permissions when a microphone is detected but does not work in an app.
If one of these steps works, you do not need to continue through every fix.
First, Identify Your Laptop Microphone Problem
Identifying the exact symptom will help you find the right solution faster.
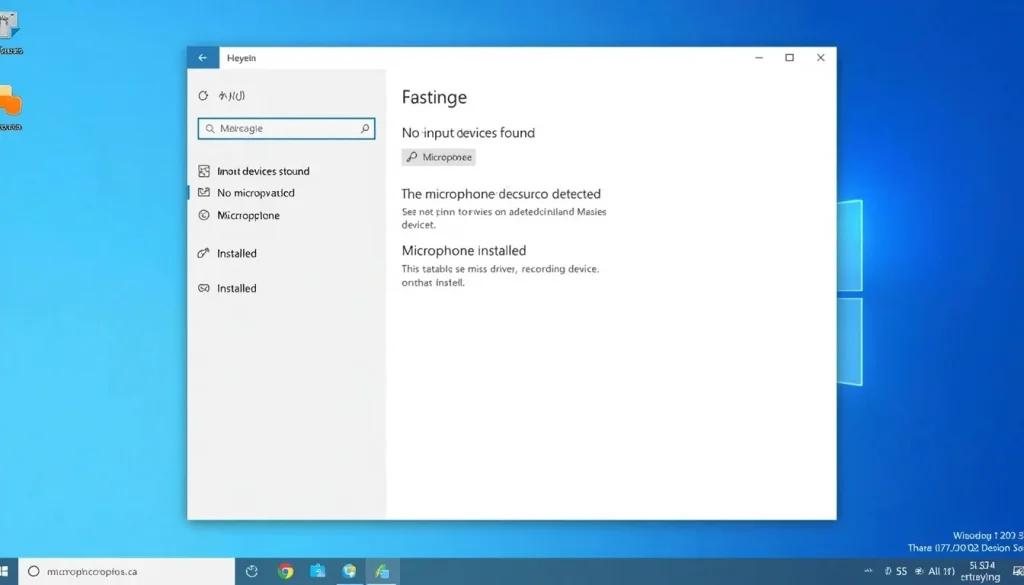
The Microphone Is Missing or Not Detected
You may see messages such as:
- No input devices found
- No microphone detected
- Microphone unavailable
- No audio input device installed
The microphone may also be missing from Sound settings, Device Manager, or the recording-device list.
This usually points to a disabled device, missing driver, driver conflict, BIOS setting, or hardware problem.
The Microphone Is Detected but Picks Up No Sound
The microphone appears in your settings, but the input meter does not move when you speak.
This problem is often caused by:
- A muted microphone
- Low input volume
- Blocked permissions
- The wrong microphone being selected
- A disabled microphone
- A faulty audio driver
The Microphone Works in One App but Not Another
If the microphone works in Sound Recorder but not in Zoom, Teams, or a browser, the hardware is probably working.
Check the microphone selection and permissions inside the affected app.
The Microphone Works in a Test but Not During Calls
An app may be using a different input device from the one you tested. The app may also be muted or blocked from using the microphone.
The Microphone Is Too Quiet, Distorted, or Noisy
Low input volume, microphone position, audio enhancements, background-noise filters, and damaged headset cables can affect microphone quality.
The Microphone Stopped Working After an Update
An operating-system update may change the default input device, reset an app permission, or expose a driver compatibility problem.
Start by checking permissions and the default microphone. Then update, reinstall, or roll back the audio driver.
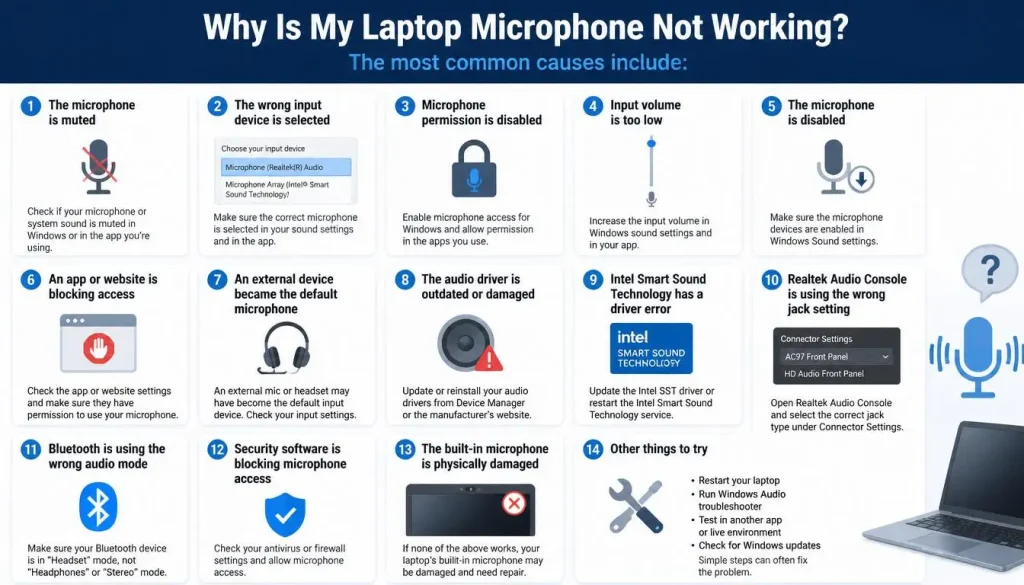
Why Is My Laptop Microphone Not Working?
The most common causes include:
- The microphone is muted
- The wrong input device is selected
- Microphone permission is disabled
- Input volume is too low
- The microphone is disabled
- An app or website is blocking access
- An external device became the default microphone
- The audio driver is outdated or damaged
- Intel Smart Sound Technology has a driver error
- Realtek Audio Console is using the wrong jack setting
- Bluetooth is using the wrong audio mode
- Security software is blocking microphone access
- The built-in microphone is physically damaged
Start with settings and permission checks. Driver and hardware fixes should come later.
How to Fix a Laptop Microphone Not Working on Windows 11 or Windows 10
The following fixes apply to both built-in and external microphones.
1. Make Sure the Microphone Is Not Muted
Look for a microphone key on your keyboard. It may show a microphone icon with a line through it.
Depending on your laptop, you may need to press:
- The microphone key
Fnplus the microphone key- A dedicated privacy button
Some laptops display a light when the microphone is muted.
You should also check:
- The mute switch on your headset
- The mute button in Zoom, Teams, Meet, or Discord
- Any physical microphone privacy switch
- The controls on a USB microphone
Speak after unmuting the device and watch the input meter.
2. Select the Correct Microphone
Windows may switch to another input device after you connect a headset, webcam, monitor, docking station, or Bluetooth device.
To select the correct microphone:
- Open Start.
- Select Settings.
- Go to System > Sound.
- Find the Input section.
- Select the microphone you want to use.
- Speak and watch the input-level meter.
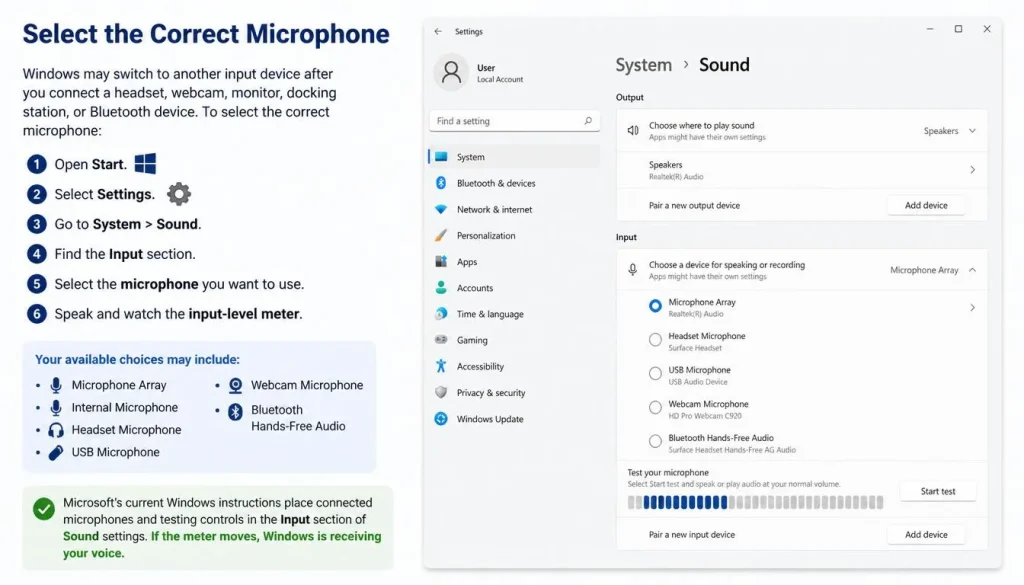
Your available choices may include:
- Microphone Array
- Internal Microphone
- Headset Microphone
- USB Microphone
- Webcam Microphone
- Bluetooth Hands-Free Audio
Microsoft’s current Windows instructions place connected microphones and testing controls in the Input section of Sound settings.
If the meter moves, Windows is receiving sound from the microphone.
3. Test the Microphone in Windows
Testing the microphone helps separate a system problem from an app problem.
- Go to Settings > System > Sound.
- Select your microphone under Input.
- Find the microphone test option.
- Start the test.
- Speak normally for several seconds.
- Stop the test and review the result.
You can also open Sound Recorder and record a short voice clip.
If the recording works, move to the settings of the app that cannot hear you.
4. Allow Microphone Access in Windows Privacy Settings
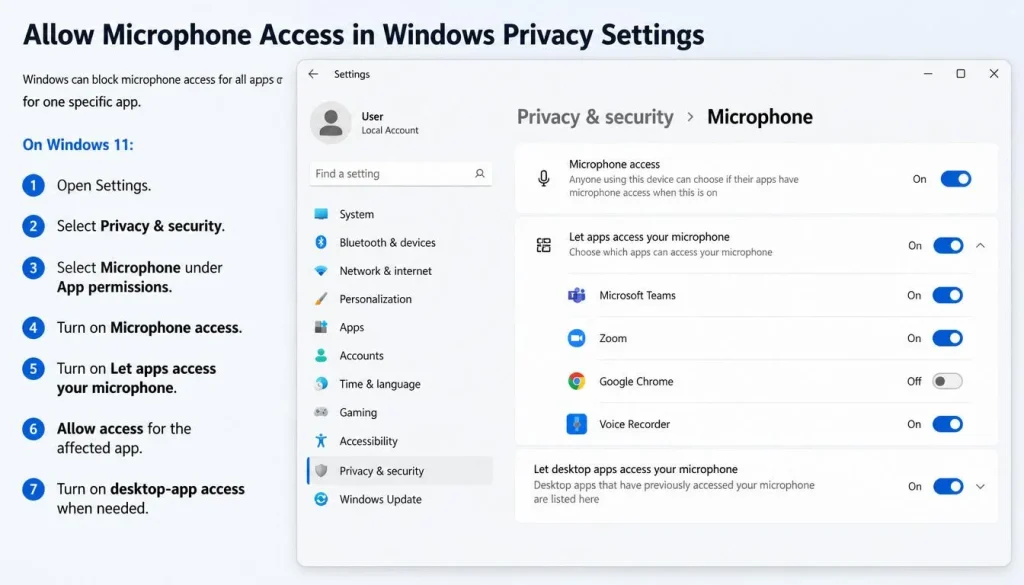
Windows can block microphone access for all apps or for one specific app.
On Windows 11:
- Open Settings.
- Select Privacy & security.
- Select Microphone under App permissions.
- Turn on Microphone access.
- Turn on Let apps access your microphone.
- Allow access for the affected app.
- Turn on desktop-app access when needed.
Windows 10 users can search for Microphone privacy settings from the Start menu.
Microsoft states that both device-level microphone access and app-level access must be enabled. Desktop programs may also require the separate desktop-app permission.
Close and reopen the affected app after changing permission settings.
5. Increase the Microphone Input Volume
Your microphone may be working but set too low.
- Open Settings > System > Sound.
- Select your microphone under Input.
- Increase the input volume.
- Speak while watching the input meter.
- Test the microphone again.
For additional controls:
- Open Control Panel.
- Select Hardware and Sound > Sound.
- Open the Recording tab.
- Double-click your microphone.
- Select the Levels tab.
- Increase the microphone level.
- Adjust Microphone Boost if available.
Increase boost gradually. Too much boost can create hiss, static, or distortion.
6. Enable the Microphone
A microphone can remain installed while being disabled.
In Windows Settings:
- Open Settings > System > Sound.
- Select All sound devices.
- Choose your microphone.
- Select Allow if the device is disabled.
You can also use the classic Sound panel:
- Open Control Panel > Sound.
- Select the Recording tab.
- Right-click an empty area.
- Enable Show Disabled Devices.
- Right-click the microphone.
- Select Enable.
Test the microphone after enabling it.
7. Set the Microphone as the Default Device
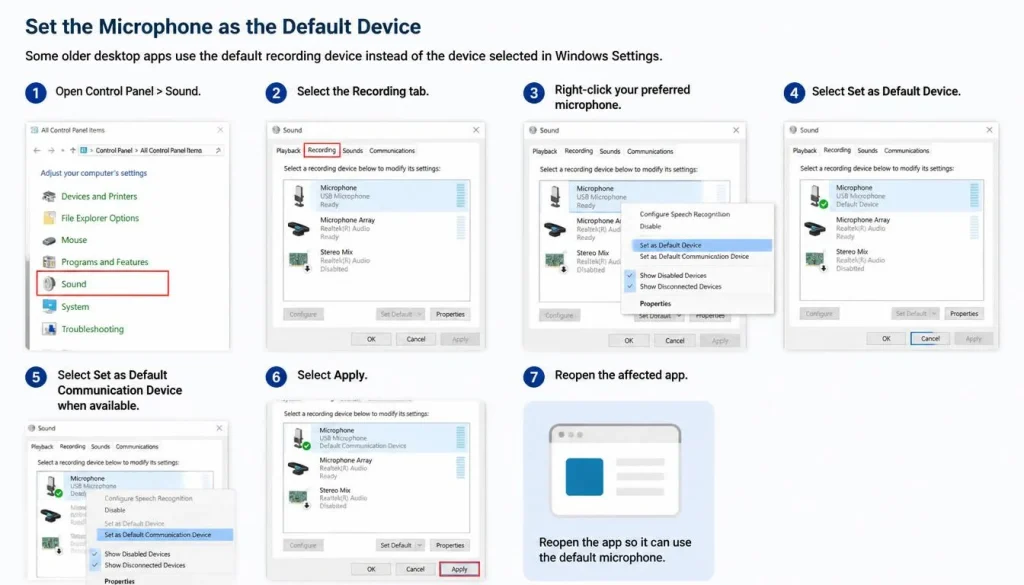
Some older desktop apps use the default recording device instead of the device selected in Windows Settings.
- Open Control Panel > Sound.
- Select the Recording tab.
- Right-click your preferred microphone.
- Select Set as Default Device.
- Select Set as Default Communication Device when available.
- Select Apply.
Reopen the affected app and check its audio settings.
8. Run the Windows Audio Troubleshooter
Windows includes an automated audio troubleshooter in the Get Help app.
- Open the Start menu.
- Search for Get Help.
- Search for microphone or audio troubleshooting.
- Run the suggested diagnostic.
- Apply any recommended fixes.
- Restart the laptop if requested.
Microsoft recommends using the automated audio troubleshooter before moving to more advanced fixes.
9. Restart Windows Audio Services
A stopped or frozen audio service can prevent the microphone from responding.
- Press
Windows + R. - Type
services.msc. - Press Enter.
- Find Windows Audio.
- Right-click it and select Restart.
- Find Windows Audio Endpoint Builder.
- Restart that service as well.
If a service is not running, open its properties and set the startup type to Automatic.
Restart the laptop and test the microphone again.
10. Update the Microphone and Audio Drivers
An outdated or damaged driver can cause the microphone to disappear or stop capturing sound.
- Right-click the Start button.
- Open Device Manager.
- Expand Audio inputs and outputs.
- Right-click your microphone.
- Select Update driver.
- Choose Search automatically for drivers.
Also check these Device Manager categories:
- Sound, video and game controllers
- System devices
- Software components
For the best compatibility, download audio, chipset, and Intel Smart Sound drivers from your laptop manufacturer’s support page.
Avoid downloading drivers from unknown driver websites.
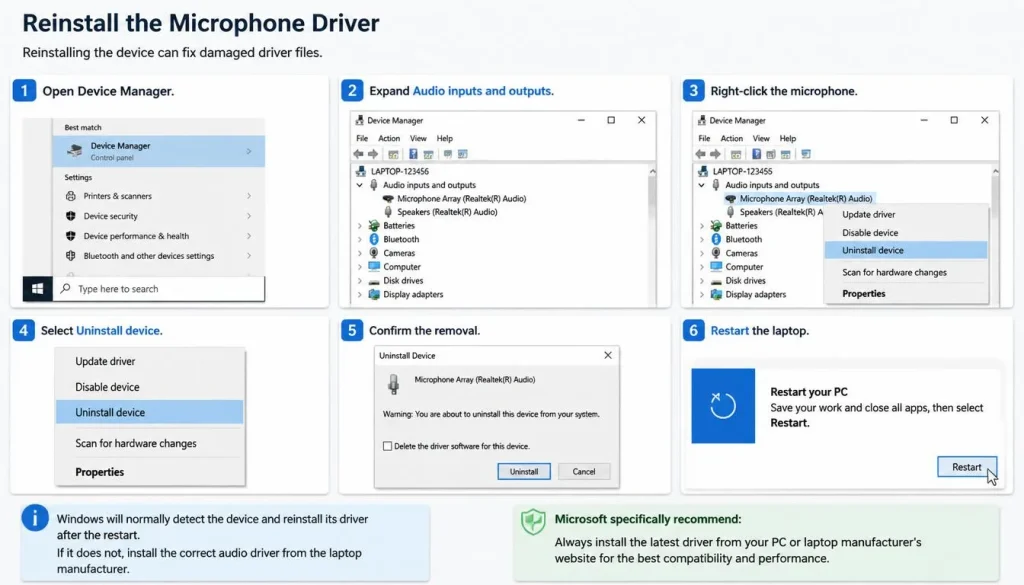
11. Reinstall the Microphone Driver
Reinstalling the device can fix damaged driver files.
- Open Device Manager.
- Expand Audio inputs and outputs.
- Right-click the microphone.
- Select Uninstall device.
- Confirm the removal.
- Restart the laptop.
Windows will normally detect the device and reinstall its driver after the restart.
If it does not, install the correct audio driver from the laptop manufacturer.
Microsoft specifically recommends driver reinstallation when Windows does not detect a microphone.
12. Roll Back the Audio Driver
Use this fix when the microphone stopped working soon after a driver or Windows update.
- Open Device Manager.
- Find the microphone or audio controller.
- Right-click it and select Properties.
- Open the Driver tab.
- Select Roll Back Driver.
- Choose a reason and confirm.
- Restart the laptop.
If the Roll Back Driver button is unavailable, Windows does not have an older driver stored. Reinstall the manufacturer’s recommended driver instead.
13. Turn Off Audio Enhancements
Audio enhancements can sometimes reduce microphone volume or stop certain apps from receiving clean input.
- Open Settings > System > Sound.
- Select your microphone.
- Find Audio enhancements.
- Turn enhancements off.
- Test the microphone.
You can also check the microphone’s properties in the classic Sound panel for enhancement or signal-processing options.
14. Check Exclusive Mode
One app may take exclusive control of the microphone and prevent another app from using it.
- Open Control Panel > Sound.
- Select the Recording tab.
- Double-click your microphone.
- Open the Advanced tab.
- Clear Allow applications to take exclusive control of this device.
- Select Apply.
- Restart the affected apps.
This setting may not appear on every laptop or driver.
15. Install Windows Updates and Optional Driver Updates
Updates may include audio-driver fixes and hardware compatibility improvements.
- Open Settings > Windows Update.
- Select Check for updates.
- Install available updates.
- Open Advanced options.
- Check Optional updates for relevant audio drivers.
- Restart the laptop.
If the problem started immediately after an update, try the rollback steps instead.
16. Check for a Recent Software Conflict
Audio utilities, recording programs, voice changers, streaming tools, and security software may interfere with microphone access.
Temporarily close programs such as:
- Voice changers
- Virtual audio cables
- Screen recorders
- Streaming software
- Noise-removal software
- Manufacturer audio-control tools
Do not disable security software permanently. Instead, check whether it includes microphone or privacy protection and allow access for the trusted app.
Some manufacturer audio packages also depend on background services that antivirus software may block. Dell, for example, documents cases where blocked Waves or MaxxAudio services can interfere with audio operation.
17. Use System Restore
Use System Restore only when the microphone worked recently and the basic fixes have failed.
- Search for Create a restore point.
- Open System Protection.
- Select System Restore.
- Choose a restore point from before the problem began.
- Review the affected programs.
- Complete the restoration.
System Restore can reverse recent driver, app, and system-setting changes. It does not normally remove personal files, but backing up important data first is still sensible.
How to Fix “No Input Devices Found” on a Laptop
If Windows shows No input devices found, focus on device detection and drivers.
Show Disabled and Disconnected Devices
- Open Control Panel > Sound.
- Select Recording.
- Right-click an empty area.
- Enable Show Disabled Devices.
- Enable Show Disconnected Devices.
- Enable the microphone if it appears.
Scan for Hardware Changes
- Open Device Manager.
- Select Action.
- Select Scan for hardware changes.
- Check Audio inputs and outputs again.
You can also restart the laptop to force a new hardware scan.
Check Other Device Manager Categories
The built-in microphone may appear under:
- Audio inputs and outputs
- Sound, video and game controllers
- System devices
- Software components
Look for warning icons beside Realtek, Intel Smart Sound Technology, Intel SST, or audio-controller entries.
Install Manufacturer-Specific Drivers
Visit the official support page for your exact laptop model and install the recommended:
- Chipset driver
- Intel Smart Sound Technology driver, when applicable
- Realtek or other audio driver
- Audio-control application
- BIOS or firmware update, only when recommended
Install drivers in the manufacturer’s recommended order.
Check BIOS or UEFI Settings
Some laptops allow the internal microphone or onboard audio to be disabled in BIOS or UEFI.
Restart the laptop and open its firmware settings. Look for options such as:
- Internal Microphone
- Onboard Audio
- Integrated Audio
- Audio Controller
Do not change unrelated settings. Save and exit only if you are certain the audio option was disabled.
Fix Intel Smart Sound Technology or Microphone Array Problems
Many modern laptops use Intel Smart Sound Technology to manage the built-in microphone array.
In Device Manager, check for entries such as:
- Intel Smart Sound Technology
- Intel SST Audio Controller
- Intel Smart Sound Technology OED
- Digital Microphones
- Microphone Array
If one has a warning icon:
- Right-click the affected device.
- Open Properties.
- Note the error message or code.
- Update or uninstall the device.
- Restart the laptop.
- Install the Intel SST and audio drivers from the laptop manufacturer.
Do not assume that installing only a generic Realtek driver will fix the problem. The internal microphone may depend on the chipset, Intel SST, and manufacturer audio package working together.
Fix a Realtek Microphone That Is Not Working
Realtek-based laptops may include Realtek Audio Console or a manufacturer-branded audio app.
Open the audio-control app and check:
- Which device is connected to the audio jack
- Whether the device is set as headphones or a headset
- Jack-detection settings
- Microphone input level
- Noise suppression
- Acoustic echo cancellation
- Connector retasking
A headset with a microphone should normally be identified as a headset, not as headphones.
If the console is missing, reinstall the full audio package from the laptop manufacturer. The driver and control app may be provided separately.
How to Fix a Laptop Microphone Not Working on a Mac
Select the Correct Input Device
- Open the Apple menu.
- Select System Settings.
- Select Sound.
- Choose Input.
- Select the built-in or external microphone.
- Speak and watch the input-level meter.
Apple places input-device selection and input-volume controls under System Settings > Sound > Input.
Increase the Input Volume
In the same Input settings:
- Select the microphone.
- Increase the input volume.
- Speak at a normal level.
- Check whether the input meter responds.
If the meter moves, the Mac is detecting your voice.
Allow Microphone Access for the App
- Open the Apple menu.
- Select System Settings.
- Select Privacy & Security.
- Select Microphone.
- Turn on access for the affected app.
Apple allows microphone access to be controlled separately for each listed app.
Close and reopen the app after changing its permission.
Close Other Apps That May Be Using the Microphone
Quit other calling or recording apps, including:
- FaceTime
- Zoom
- Microsoft Teams
- Discord
- Browser tabs
- Audio recording software
Then reopen only the app you want to use.
Disconnect External Audio Devices
Disconnect or turn off:
- USB microphones
- Headsets
- Webcams
- Bluetooth earbuds
- Docking stations
- External displays with audio devices
Return to System Settings > Sound > Input and select the built-in microphone.
Update macOS and the App
Install available macOS updates and update the affected app.
If the problem affects only one app, reinstalling that app may be more useful than changing system-wide audio settings.
Test the Microphone in Another App
Record a short clip in a recording app or test the microphone in another calling app.
If no app receives sound and the input meter remains still, the Mac may have a system-level or hardware problem.
How to Fix a Microphone Not Working on a Chromebook
Check the Microphone Privacy Control
Open Chromebook Settings and review the microphone control under Privacy and security.
Make sure microphone access is enabled for the app or site you want to use. Google notes that ChromeOS privacy controls can affect Chrome web apps and supported Android apps.
Select the Correct Input Device
- Open the Quick Settings panel.
- Open the audio controls.
- Find the input section.
- Select the built-in or external microphone.
- Adjust the input level.
Disconnect Bluetooth devices if the Chromebook keeps choosing the wrong input.
Check Website Permission
In Chrome:
- Open the website.
- Select the icon beside the address bar.
- Open the site permissions.
- Set Microphone to Allow.
- Reload the page.
Restart and Update the Chromebook
Restart the device, then install available ChromeOS updates.
For a managed school or work Chromebook, an administrator may control microphone permissions.
Laptop Microphone Works in Windows but Not in an App
When the Windows microphone test works, avoid repeatedly reinstalling the hardware driver. Focus on the affected app.
Select the Microphone Inside the App
Most communication apps have their own input-device menu.
Open the app’s audio settings and select the same microphone that worked in Windows.
Avoid leaving the setting on Default while troubleshooting. Select the device by name.
Check App-Level Mute Controls
Look for:
- A muted microphone icon
- Push-to-talk mode
- Input sensitivity
- A meeting-host mute
- A keyboard shortcut that controls mute
- A physical headset mute switch
Restart the App After Changing Permissions
Many apps need to be closed and reopened before they recognise a new microphone permission or input device.
Close Competing Apps
Exit other apps that may be recording or controlling the microphone.
Then reopen only the affected app and test it again.
Update or Reinstall the App
If the microphone works everywhere except one app:
- Update the app.
- Reset its audio settings if that option exists.
- Sign out and sign back in.
- Reinstall the app if necessary.
Microphone Not Working in Zoom, Teams, Google Meet, or Discord
Zoom
In Zoom:
- Open Settings.
- Select Audio.
- Choose the correct microphone.
- Use the microphone test.
- Check that you joined the meeting with computer audio.
- Make sure you are not muted.
Zoom also provides test meetings that check the speaker and microphone before a real call.
Microsoft Teams
In Teams:
- Open Settings.
- Select Devices.
- Choose the correct microphone.
- Use the test-call feature when available.
- Check Windows or Mac microphone permissions.
- Rejoin the meeting.
Microsoft recommends checking both operating-system permission and the microphone selected inside Teams.
Google Meet
In Google Meet:
- Open a meeting.
- Select More options.
- Open Settings > Audio.
- Select the correct microphone.
- Check the microphone indicator.
- Allow microphone access for the website.
- Reload the meeting page.
Discord
In Discord:
- Open User Settings.
- Select Voice & Video.
- Choose the correct input device.
- Check input volume.
- Check input mode.
- Test push-to-talk or voice activity.
- Reset voice settings if needed.
Also check operating-system permissions for the Discord desktop app or browser.
How to Fix a Microphone Not Working in Chrome or Another Browser
A website needs permission from both the browser and the operating system.
Allow Microphone Access for the Website
Select the site-information icon beside the browser’s address bar and set microphone access to Allow.
Reload the page after changing the permission.
Select the Correct Microphone in Chrome
In Chrome:
- Open Settings.
- Select Privacy and security.
- Select Site settings.
- Select Microphone.
- Choose the preferred default microphone.
- Review sites that are blocked.
Google’s Chrome instructions allow users to select a default microphone and manage site-level microphone permission from Site settings.
Check Edge, Firefox, or Safari Permissions
Each browser has its own site-permission controls.
Look for microphone settings under:
- Edge: Settings, Cookies and site permissions
- Firefox: Settings, Privacy & Security, Permissions
- Safari: Safari Settings, Websites, Microphone
Set the affected site to Allow or Ask, then reload it.
Disable Conflicting Browser Extensions
Privacy, security, recording, and audio-processing extensions may interfere with microphone access.
Temporarily disable likely extensions and test the site again.
Test in a Private Window
Open the site in an Incognito or private-browsing window.
If the microphone works there, an extension, stored permission, cookie, or cached site setting may be causing the problem.
Reset the Site Permission
Remove the saved microphone permission for the affected website, reload the page, and select Allow when prompted again.
Headset Microphone Not Working on a Laptop
Check the Headset Mute Switch
Many gaming and business headsets have an inline or ear-cup mute control.
Move the switch in both directions and test the microphone.
Check the Connector Type
A laptop with one combined audio port normally expects a four-contact TRRS headset plug.
A three-contact headphone plug carries sound but not a microphone signal. Separate desktop-style microphone and headphone plugs may require a compatible headset splitter.
Choose Headset Instead of Headphones
When the laptop asks what you connected, choose Headset.
Selecting Headphones may enable audio output but not microphone input.
Reconnect the Headset
Remove the plug fully, inspect it for dirt or damage, and reconnect it firmly.
For USB headsets, try another USB port.
Test the Headset on Another Device
If the headset microphone fails on another laptop or phone, the headset or cable may be damaged.
Bluetooth Microphone Connected but Not Working
Bluetooth headphones may support separate modes for high-quality playback and two-way communication.
Try these steps:
- Disconnect and reconnect the Bluetooth device.
- Select its hands-free or headset microphone as the input.
- Close apps that may be controlling the device.
- Remove the Bluetooth device and pair it again.
- Update the laptop’s Bluetooth and audio drivers.
- Charge the headset.
- Test the built-in laptop microphone with Bluetooth turned off.
If audio quality drops while the microphone is active, that can be related to the Bluetooth communication profile rather than a damaged microphone.
USB or Webcam Microphone Not Working
Try Another USB Port
Connect the device directly to the laptop instead of a passive hub or docking station.
Select the USB or Webcam Microphone
A webcam can provide both a camera and a microphone. Select the webcam microphone in Windows, macOS, and the calling app.
Check Camera Permission
Some systems may associate a webcam’s microphone with camera-related privacy controls. Microsoft notes that a camera containing a microphone may require camera permission as well as microphone permission.
Reinstall the Device
Remove the USB microphone or webcam in Device Manager, restart the laptop, and reconnect the device.
Install the manufacturer’s software only when the device requires it.
Laptop Microphone Stops Working After Sleep or Hibernate
Try the following:
- Close and reopen the affected app.
- Disconnect and reconnect external audio devices.
- Restart Windows Audio services.
- Restart the laptop.
- Update audio, chipset, and Bluetooth drivers.
- Install relevant firmware or BIOS updates from the manufacturer.
Sleep-related device failures can be linked to driver or power-state problems. Manufacturer troubleshooting commonly recommends updating chipset and firmware components for persistent wake issues.
Avoid changing advanced power or BIOS settings unless the simpler fixes fail.
Laptop Microphone Is Too Quiet
Use these fixes:
- Increase the input volume
- Increase Microphone Boost gradually
- Move closer to the microphone
- Remove any case or object covering the mic openings
- Select the correct microphone array
- Turn off aggressive noise suppression
- Disable audio enhancements for testing
- Clean the microphone openings carefully
- Test in a quiet room
Do not insert pins, liquid, or compressed air directly into a tiny microphone opening.
Laptop Microphone Has Static, Echo, or Background Noise
Try these steps:
- Lower Microphone Boost.
- Move the laptop away from fans and air conditioners.
- Disconnect nearby charging or USB accessories.
- Test the laptop while running on battery power.
- Move external microphones away from speakers.
- Use headphones to prevent speaker echo.
- Turn audio enhancements off and on for comparison.
- Update the audio driver.
- Test another microphone.
If static changes when you move the headset cable, the plug or cable may be damaged.
How to Tell If the Laptop Microphone Has a Hardware Problem
Software troubleshooting cannot repair a physically damaged microphone.
Test an External Microphone
Connect a known working USB microphone or headset.
The result can help narrow the problem:
- If the external mic works, the built-in mic or its driver may be faulty.
- If no microphone works, check permissions, drivers, and system settings.
- If a USB mic works but a headset mic does not, inspect the audio jack and connector type.
Inspect the Microphone Openings
Laptop microphones are often located near the webcam, keyboard, or palm rest.
Check for:
- Dust or debris
- A case covering the opening
- Tape over the microphone
- Liquid damage
- Impact damage
- A damaged display bezel
Clean the surface gently with a soft, dry brush.
Run Manufacturer Diagnostics
Many laptop brands provide hardware-diagnostic tools.
Use the official diagnostic utility for your exact model and run audio or microphone tests when available.
Check the Repair History
A microphone cable may have been left disconnected after screen, webcam, or motherboard repair.
This is more likely when the microphone stopped working immediately after the laptop was serviced.
When Should You Get the Laptop Repaired?
Consider professional repair when:
- The microphone is missing from both Windows and BIOS diagnostics
- External microphones work but the built-in microphone never appears
- The laptop has liquid or impact damage
- The microphone produces constant crackling
- The microphone cable may have been disturbed during a repair
- Driver reinstallation does not restore the device
- The laptop is still covered by warranty
Avoid opening a laptop that is under warranty unless the manufacturer allows user servicing.
How to Prevent Future Laptop Microphone Problems
You can reduce future microphone issues by following a few simple habits:
- Keep operating-system and audio drivers updated
- Download drivers from the laptop manufacturer
- Review privacy permissions after major updates
- Disconnect unused Bluetooth audio devices
- Avoid pulling a headset out by its cable
- Keep microphone openings clean
- Store headsets carefully
- Create a restore point before major driver changes
- Test the microphone before an important call
Frequently Asked Questions
Why did my laptop microphone suddenly stop working?
The microphone may have been muted, blocked by privacy settings, replaced by another default input device, or affected by an app or driver update. Restart the laptop, check the selected input, and review microphone permissions first.
How do I enable my built-in laptop microphone?
Open your sound settings, select the internal microphone or Microphone Array, and make sure it is enabled. On Windows, also check Privacy & security > Microphone and allow app access.
Why is my microphone detected but not picking up sound?
The microphone may be muted, set too low, blocked by privacy settings, or selected incorrectly inside the app. Watch the input meter in your system sound settings while speaking.
Why does Windows say “No input devices found”?
The microphone may be disabled, missing a driver, hidden in Device Manager, or affected by an Intel SST or Realtek driver problem. Scan for hardware changes and reinstall the manufacturer’s audio drivers.
Why does my microphone work in Windows but not in Zoom or Teams?
Zoom or Teams may be using a different microphone or may not have operating-system permission. Select the microphone by name inside the app and restart the app after changing permissions.
Why is my laptop microphone not working after a Windows update?
An update may reset permissions, change the default input device, or install an incompatible driver. Check permissions and input selection before rolling back or reinstalling the audio driver.
Why does my microphone stop working when I connect headphones?
Windows may switch to the headset microphone, even when the headset has no working mic. Select the built-in microphone manually or choose the correct headset type in the Realtek audio app.
Why is my laptop microphone so quiet?
Low input volume, poor microphone position, blocked microphone openings, noise suppression, or an incorrect input device can make the microphone sound quiet. Increase the input level and Microphone Boost gradually.
Can antivirus software block my microphone?
Yes. Some security tools include webcam and microphone privacy controls. Allow microphone access for trusted apps rather than disabling the security software permanently.
How do I know if my laptop microphone is damaged?
Test the microphone in several apps, reinstall the correct driver, and try an external microphone. If the external mic works but the internal mic remains missing or silent, the built-in microphone or its connection may be damaged.
Final Thoughts
When a laptop microphone is not working, begin with the simplest checks. Make sure the microphone is unmuted, select the correct input device, increase its volume, and allow microphone access.
If the microphone is detected but works only in certain apps, check the microphone selected inside those apps. If Windows reports no input devices, focus on Device Manager, Intel Smart Sound Technology, Realtek drivers, and manufacturer-specific audio packages.
External headsets, webcams, Bluetooth devices, browsers, and security software can also change or block the active microphone. Hardware repair should be considered only after permissions, settings, apps, and drivers have been tested.

“Electronics aren’t just gadgets. They’re the invisible threads that connect our work, our play, and our world.”
I’m Julian Reed, and my obsession with tech started at age twelve, when I soldered a defunct gaming console back to life in my bedroom. That tiny green screen taught me that technology isn’t just a black box, it’s a tool you can master.
After fifteen years as a hardware engineer and a decade reviewing consumer tech, I’ve joined this team to cut through the jargon. Whether you’re building a high-end home theater or just need a laptop that won’t lag, I’m here to help you choose the gear that truly powers your life.