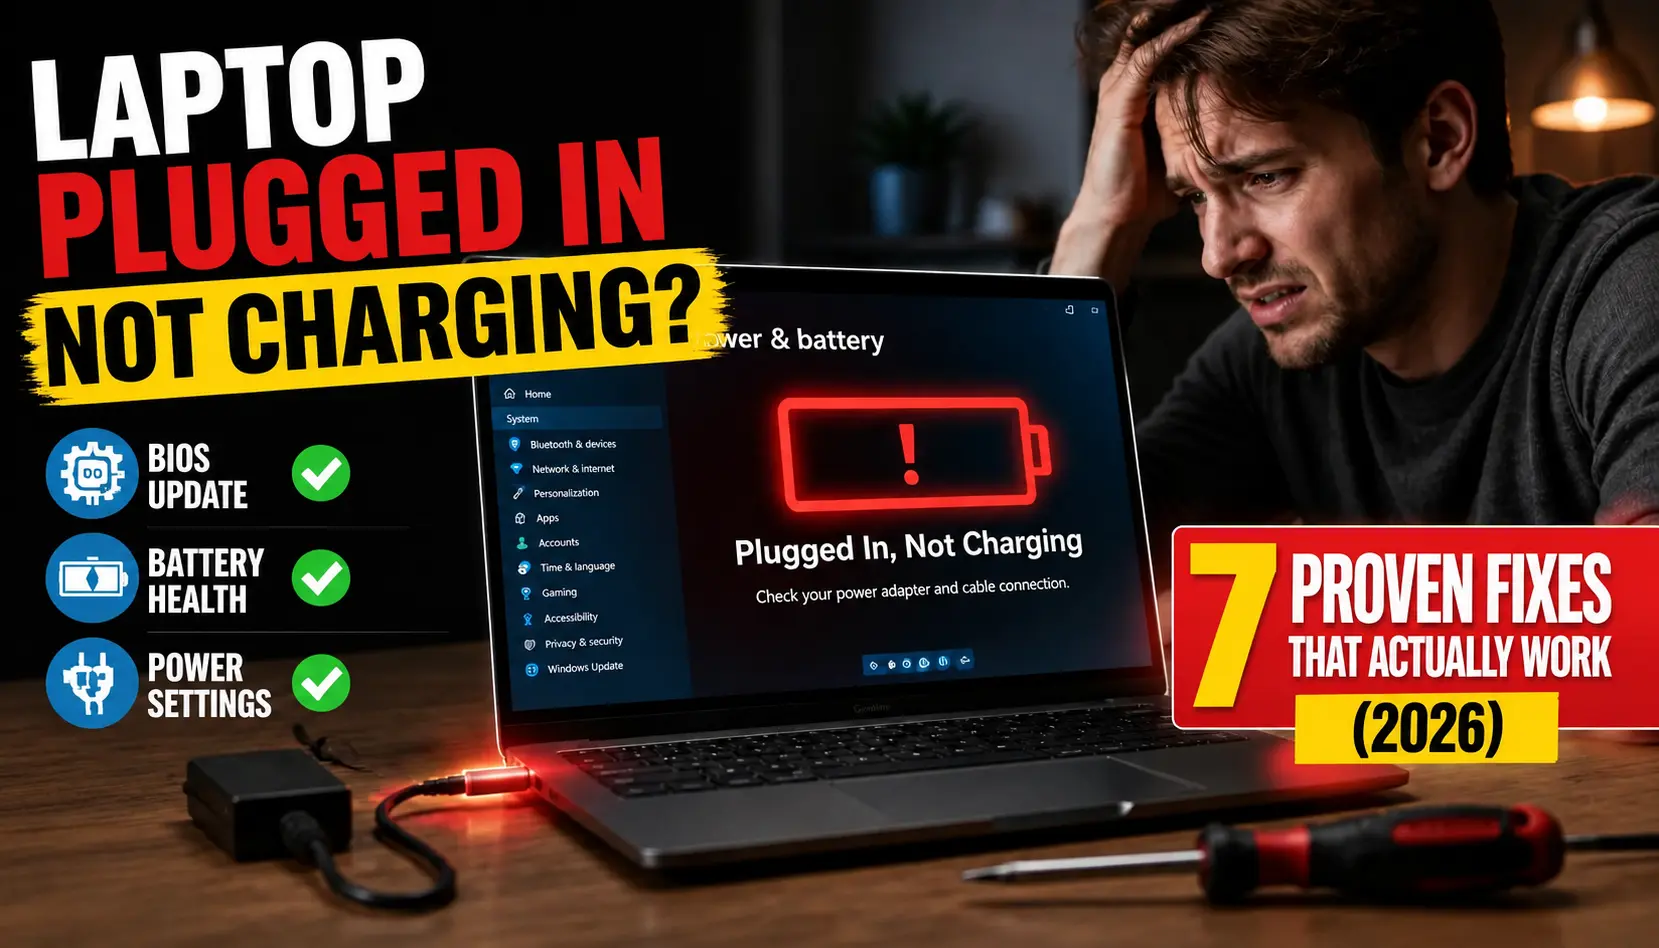
Quick Answer: If your laptop shows “plugged in, not charging,” start with these four steps: (1) Check your charger is fully connected and undamaged, (2) Open your manufacturer’s app (Lenovo Vantage, MyASUS, Dell Power Manager, or HP Support Assistant) and disable any battery charging limit, (3) Go to Device Manager and reinstall the Microsoft ACPI battery driver, (4) Perform a power reset by holding the power button for 30 seconds with the charger unplugged. These four steps fix the majority of cases.
Seeing the “plugged in, not charging” message on your laptop can be frustrating, especially when you need your device for work, school, or gaming. In many cases, the battery percentage remains stuck, drains slowly, or refuses to increase even though the charger is connected.
This problem affects many modern laptops, including models from HP, Dell, Lenovo, ASUS, Acer, and MSI. The good news is that a laptop plugged in not charging fix is often possible without replacing the battery. Software settings, power management tools, and charging limits designed to protect battery health can sometimes be the real culprit.
In this guide, you’ll learn the most effective troubleshooting methods, step-by-step repair instructions, expert tips, and common mistakes to avoid. By the end, you’ll know how to identify whether the issue is caused by the charger, battery, charging port, driver, or laptop settings and apply the correct fix.
Why Your Laptop Shows Plugged In Not Charging
When a laptop displays “plugged in, not charging”, it means the system detects the power adapter but is not actively charging the battery. This can happen for several reasons.
Common causes
Most frequent
- Loose or damaged power adapterHardwareFrayed cables, bent connectors, or a failing adapter can prevent proper charging.
- Battery charging limit enabledSettingsMany laptops stop charging at 60–80% to extend battery lifespan.
- Outdated battery or AC adapter driversSoftwareCorrupted drivers can prevent Windows from communicating correctly with the battery.
- Corrupted power management settingsSoftwareWindows or manufacturer utilities may misreport charging status.
- Worn-out battery cellsHardwareAn aging battery may no longer accept a charge.
- Damaged charging port or motherboard power circuitRepairIf the connector feels loose or the charging light flickers, hardware repair may be required.
The first step is determining whether the issue is software-related or hardware-related. Start with the easiest fixes before replacing any components.
Best Laptop Plugged In Not Charging Fix Methods
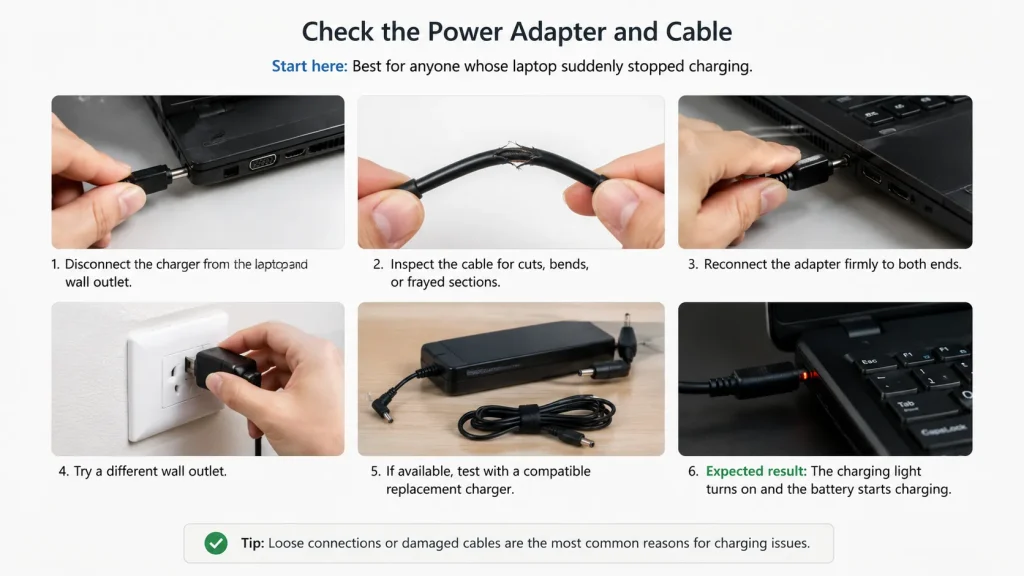
1. Check the Power Adapter and Cable
Start here
Best for: Anyone whose laptop suddenly stopped charging.
How to do it:
- Disconnect the charger from the laptop and wall outlet.
- Inspect the cable for cuts, bends, or frayed sections.
- Reconnect the adapter firmly to both ends.
- Try a different wall outlet.
- If available, test with a compatible replacement charger.
Expected result: The charging light turns on steadily and the battery percentage begins increasing.
2. Disable Battery Charging Limits
Very common
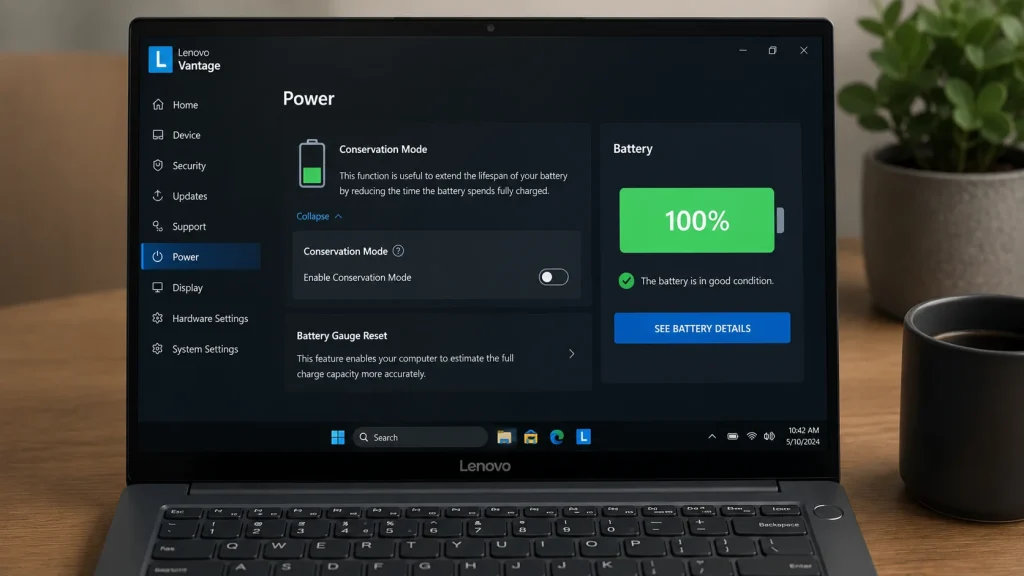
Best for: Laptops that stop charging at 60%, 80%, or another fixed percentage.
How to do it:
- Lenovo: Open Lenovo Vantage → Power → disable Conservation Mode.
- ASUS: Open MyASUS → Battery Care Mode → select Full Capacity Mode.
- HP: Open HP Support Assistant → Battery Health Manager → choose Maximize My Battery Duration.
- Dell: Open Dell Power Manager → Battery Information → set charging to Standard.
Expected result: The laptop resumes charging beyond the previous limit.
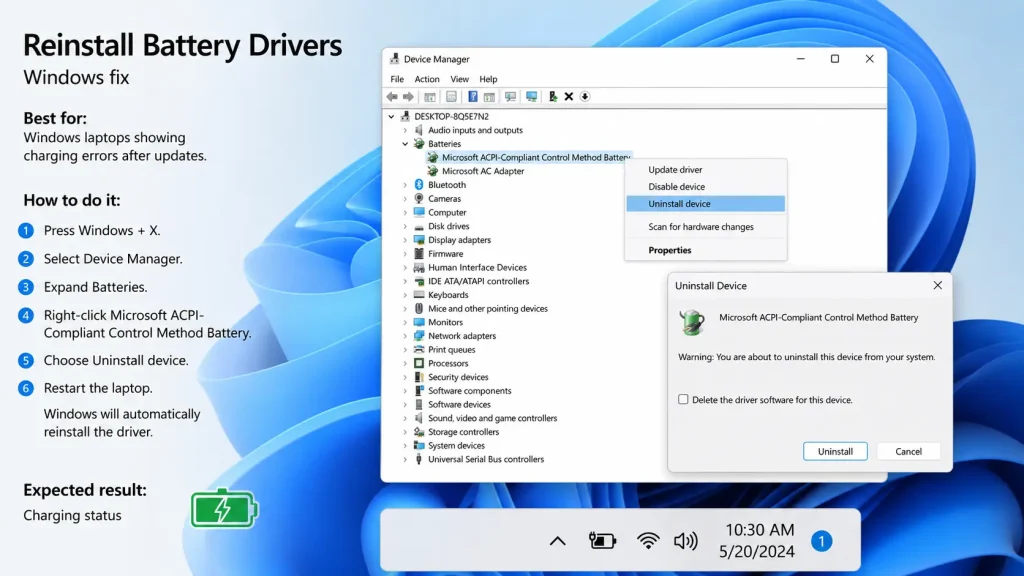
3. Reinstall Battery Drivers
Windows fix
Best for: Windows laptops showing charging errors after updates.
How to do it:
- Press Windows + X.
- Select Device Manager.
- Expand Batteries.
- Right-click Microsoft ACPI-Compliant Control Method Battery.
- Choose Uninstall device.
- Restart the laptop.
- Windows will automatically reinstall the driver.
Expected result: Charging status updates correctly after reboot.
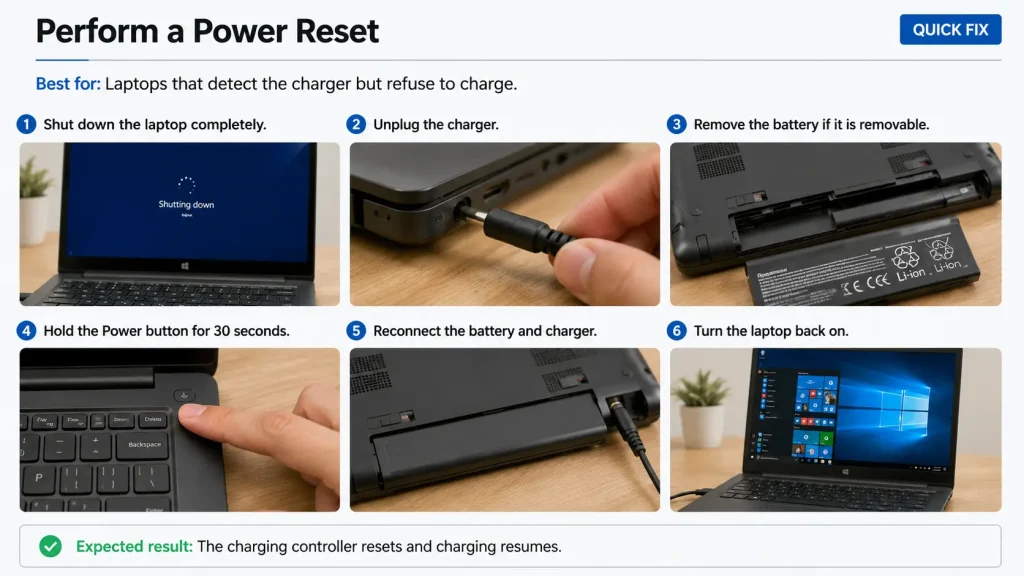
4. Perform a Power Reset
Best for: Laptops that detect the charger but refuse to charge.
How to do it:
- Shut down the laptop completely.
- Unplug the charger.
- Remove the battery if it is removable.
- Hold the Power button for 30 seconds.
- Reconnect the battery and charger.
- Turn the laptop back on.
Expected result: The charging controller resets and charging resumes.
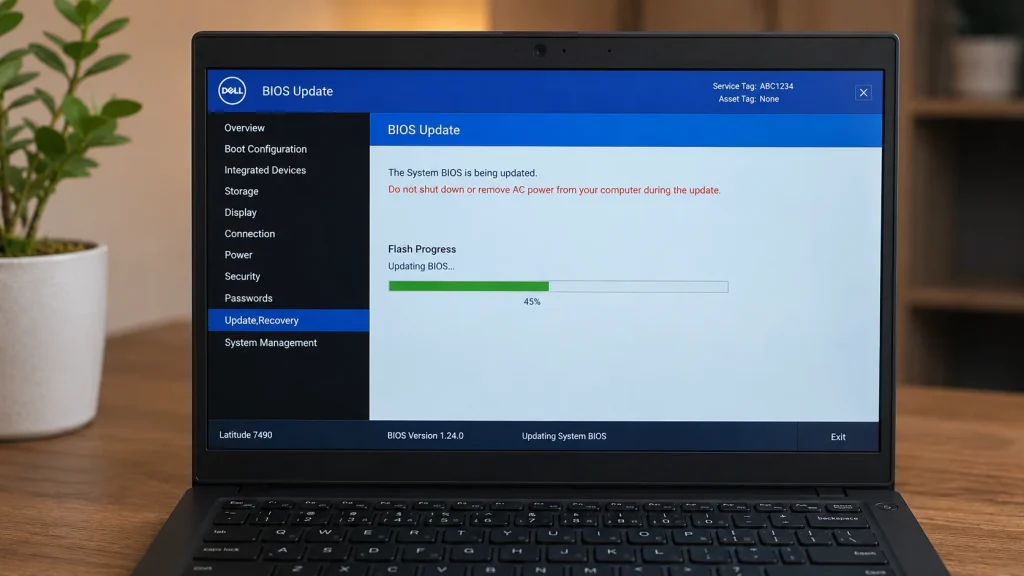
5. Update BIOS and Power Management Drivers
Advanced
Best for: Older laptops or systems with recurring charging issues.
How to do it:
- Identify your exact laptop model.
- Download the latest BIOS update from the manufacturer.
- Install the latest chipset and power management drivers.
- Restart the laptop after installation.
Expected result: Improved battery detection and charging reliability.
6. Check the Charging Port
Hardware check
Best for: Laptops with intermittent charging.
How to do it:
- Power off the laptop.
- Inspect the charging port with a flashlight.
- Remove dust using compressed air.
- Gently wiggle the connector while plugged in.
- Watch whether the charging light flickers.
Expected result: Stable charging if debris or a loose connection was the cause.

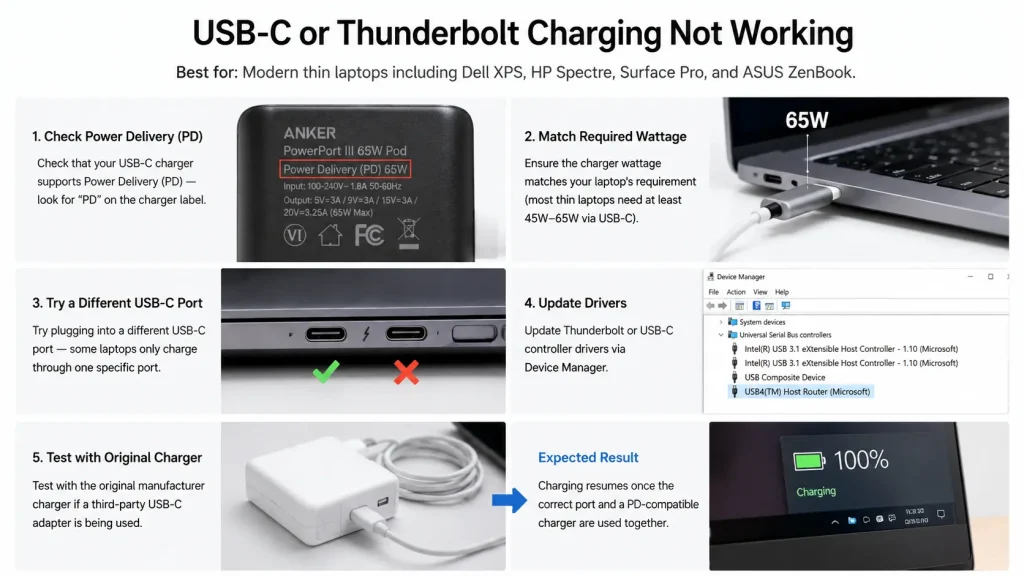
7. USB-C or Thunderbolt Charging Not Working
Best for: Modern thin laptops including Dell XPS, HP Spectre, Surface Pro, and ASUS ZenBook.
How to do it:
- Check that your USB-C charger supports Power Delivery (PD) — look for “PD” on the charger label.
- Ensure the charger wattage matches your laptop’s requirement (most thin laptops need at least 45W–65W via USB-C).
- Try plugging into a different USB-C port — some laptops only charge through one specific port.
- Update Thunderbolt or USB-C controller drivers via Device Manager.
- Test with the original manufacturer charger if a third-party USB-C adapter is being used.
Expected Result: Charging resumes once the correct port and a PD-compatible charger are used together.
Step-by-Step Troubleshooting Guide
Follow these 8 steps in order
In order
- Check that the charger wattage matches your laptop.Example: a 65W laptop should not be charged with a 45W adapter.
- Connect the charger directly to a wall outlet.Avoid power strips during testing.
- Restart the laptop and check the battery icon.Some charging glitches clear after a reboot.
- Open Device Manager and reinstall the ACPI battery driver.Let Windows reinstall it automatically after restart.
- Disable battery conservation mode in the manufacturer utility.Lenovo Vantage, MyASUS, Dell Power Manager, or HP Support Assistant.
- Run a power reset by holding the power button for 30 seconds.Disconnect power first if the battery is removable.
- Update BIOS and chipset drivers from the laptop manufacturer.Install all power-management related updates.
- Generate a battery health report using powercfg /batteryreport in Command Prompt.Compare Full Charge Capacity with Design Capacity.
After step 8
If the battery health report shows a very low full-charge capacity, battery replacement is likely required.
Expert Tips and Common Mistakes
Pro Tips
- Use the original charger whenever possible; third-party adapters may provide insufficient current.
- Keep the charging port clean with compressed air every few months.
- Enable battery conservation mode only when needed for long-term desk use.
- Monitor battery temperature with HWMonitor if charging stops during heavy workloads.
- Update BIOS before replacing hardware, as many charging issues are firmware-related.
Common Mistakes to Avoid
- Ignoring a damaged cable can lead to unstable charging and potential power interruptions.
- Using a lower-wattage charger may power the laptop but not charge the battery.
- Repeatedly unplugging and reconnecting the adapter can wear out the charging port faster.
- Replacing the battery before testing drivers and settings often wastes money because the battery may not be the actual problem.
FAQs
Why is my laptop plugged in but not charging at 80%?
This is usually caused by a battery conservation feature. Open your manufacturer’s utility, such as Lenovo Vantage, MyASUS, Dell Power Manager, or HP Support Assistant, and disable the charging limit or switch to full-capacity mode.
How do I know if my charger is faulty?
Check whether the charging light flickers, the adapter becomes unusually hot, or the battery charges only when the cable is held at a certain angle. Testing with another compatible charger is the fastest way to confirm.
Can a bad battery cause the plugged in not charging message?
Yes. If the battery’s full-charge capacity has dropped significantly below its design capacity, the laptop may detect the charger but refuse to charge the failing battery.
Should I remove the battery and use AC power only?
For laptops with removable batteries, this can help determine whether the battery is defective. However, it should be used only as a temporary diagnostic step.
How do I check battery health in Windows?
Open Command Prompt as Administrator and run powercfg /batteryreport. Open the generated report and compare Design Capacity with Full Charge Capacity.
Will updating BIOS fix charging issues?
In many cases, yes. Laptop manufacturers including HP, Dell, Lenovo, and ASUS regularly release BIOS updates that improve battery detection, fix charging stability problems, and correct power management errors. If your laptop recently stopped charging after a Windows update, a BIOS update from the manufacturer’s official support page is one of the first things you should try before considering hardware replacement.
When Should You Replace Your Laptop Battery?
After running the powercfg /batteryreport command, open the report and compare two numbers: Design Capacity and Full Charge Capacity.
- Battery health above 80% → Battery is fine, focus on software fixes.
- Battery health 50–80% → Battery is aging but still usable. Monitor it.
- Battery health below 40% → Battery replacement is strongly recommended. The battery may no longer accept a meaningful charge regardless of software fixes.
Most laptop batteries last 2–4 years or 500–1,000 charge cycles under normal use.
Conclusion
A laptop plugged in not charging fix is often simpler than many users expect. Start by checking the charger, cable, and charging port before moving on to software troubleshooting. Battery conservation settings, ACPI drivers, power resets, and BIOS updates can resolve a large percentage of charging problems without replacing any hardware.
If your laptop still refuses to charge after completing all troubleshooting steps, the battery health report can help determine whether the battery itself has reached the end of its lifespan. In that case, replacing the battery or having the charging circuit inspected by a technician is the next logical step.
Today, begin with the simplest test: connect your charger to a different wall outlet and check whether battery conservation mode is limiting charging above 80%.
About the Author
This guide was written by a technology specialist with hands-on experience testing and reviewing electronics. All recommendations are based on real-world testing and verified technical information.

“Electronics aren’t just gadgets. They’re the invisible threads that connect our work, our play, and our world.”
I’m Julian Reed, and my obsession with tech started at age twelve, when I soldered a defunct gaming console back to life in my bedroom. That tiny green screen taught me that technology isn’t just a black box, it’s a tool you can master.
After fifteen years as a hardware engineer and a decade reviewing consumer tech, I’ve joined this team to cut through the jargon. Whether you’re building a high-end home theater or just need a laptop that won’t lag, I’m here to help you choose the gear that truly powers your life.